IA & Agentes
Copilot Studio - Tools e Conectores [1] - O catálogo de 1000+ conectores
Copilot Studio - Tools & Connectors [1] - The 1000+ connector catalog
![Copilot Studio - Tools e Conectores [1] - O catálogo de 1000+ conectores](/images/copilot-tools-1-capa.png)
Fala dataholics! Semana nova e série nova por aqui. A gente passou a semana passada inteira falando de Knowledge, ou seja, de como o agente lê e busca informação. Agora vira a chave: nessa série eu quero mostrar como o agente faz coisa, consulta um banco, lê sua agenda, chama uma API, dispara um fluxo. E o jeito mais rápido de dar essa mão pro seu agente é pelas Tools, com destaque pro catálogo de conectores do Power Platform, que são mais de mil prontos pra usar. Hoje é o post de abertura: o que é esse catálogo, como um conector vira tool do agente e uma demo de ponta a ponta que eu rodei no meu agente Datainaction.
O que veremos nesse post:
A aba Tools e a sua primeira tool
O catálogo por dentro (e por que tem mais de 1000)
Uma palavrinha sobre o nome: Actions virou Tools
Os 3 tipos de conector: standard, premium e custom
Demo: adicionando e testando uma tool de verdade
Autenticação: quem chama a API, você ou o usuário
A descrição é o que o modelo lê
Resumo
A aba Tools e a sua primeira tool
Todo agente novo no Copilot Studio nasce com a aba Tools vazia, com aquele convite bonitinho: "Create your first tool. Let your agent do more". É daqui que a gente parte, é literalmente onde você dá superpoderes pro agente.
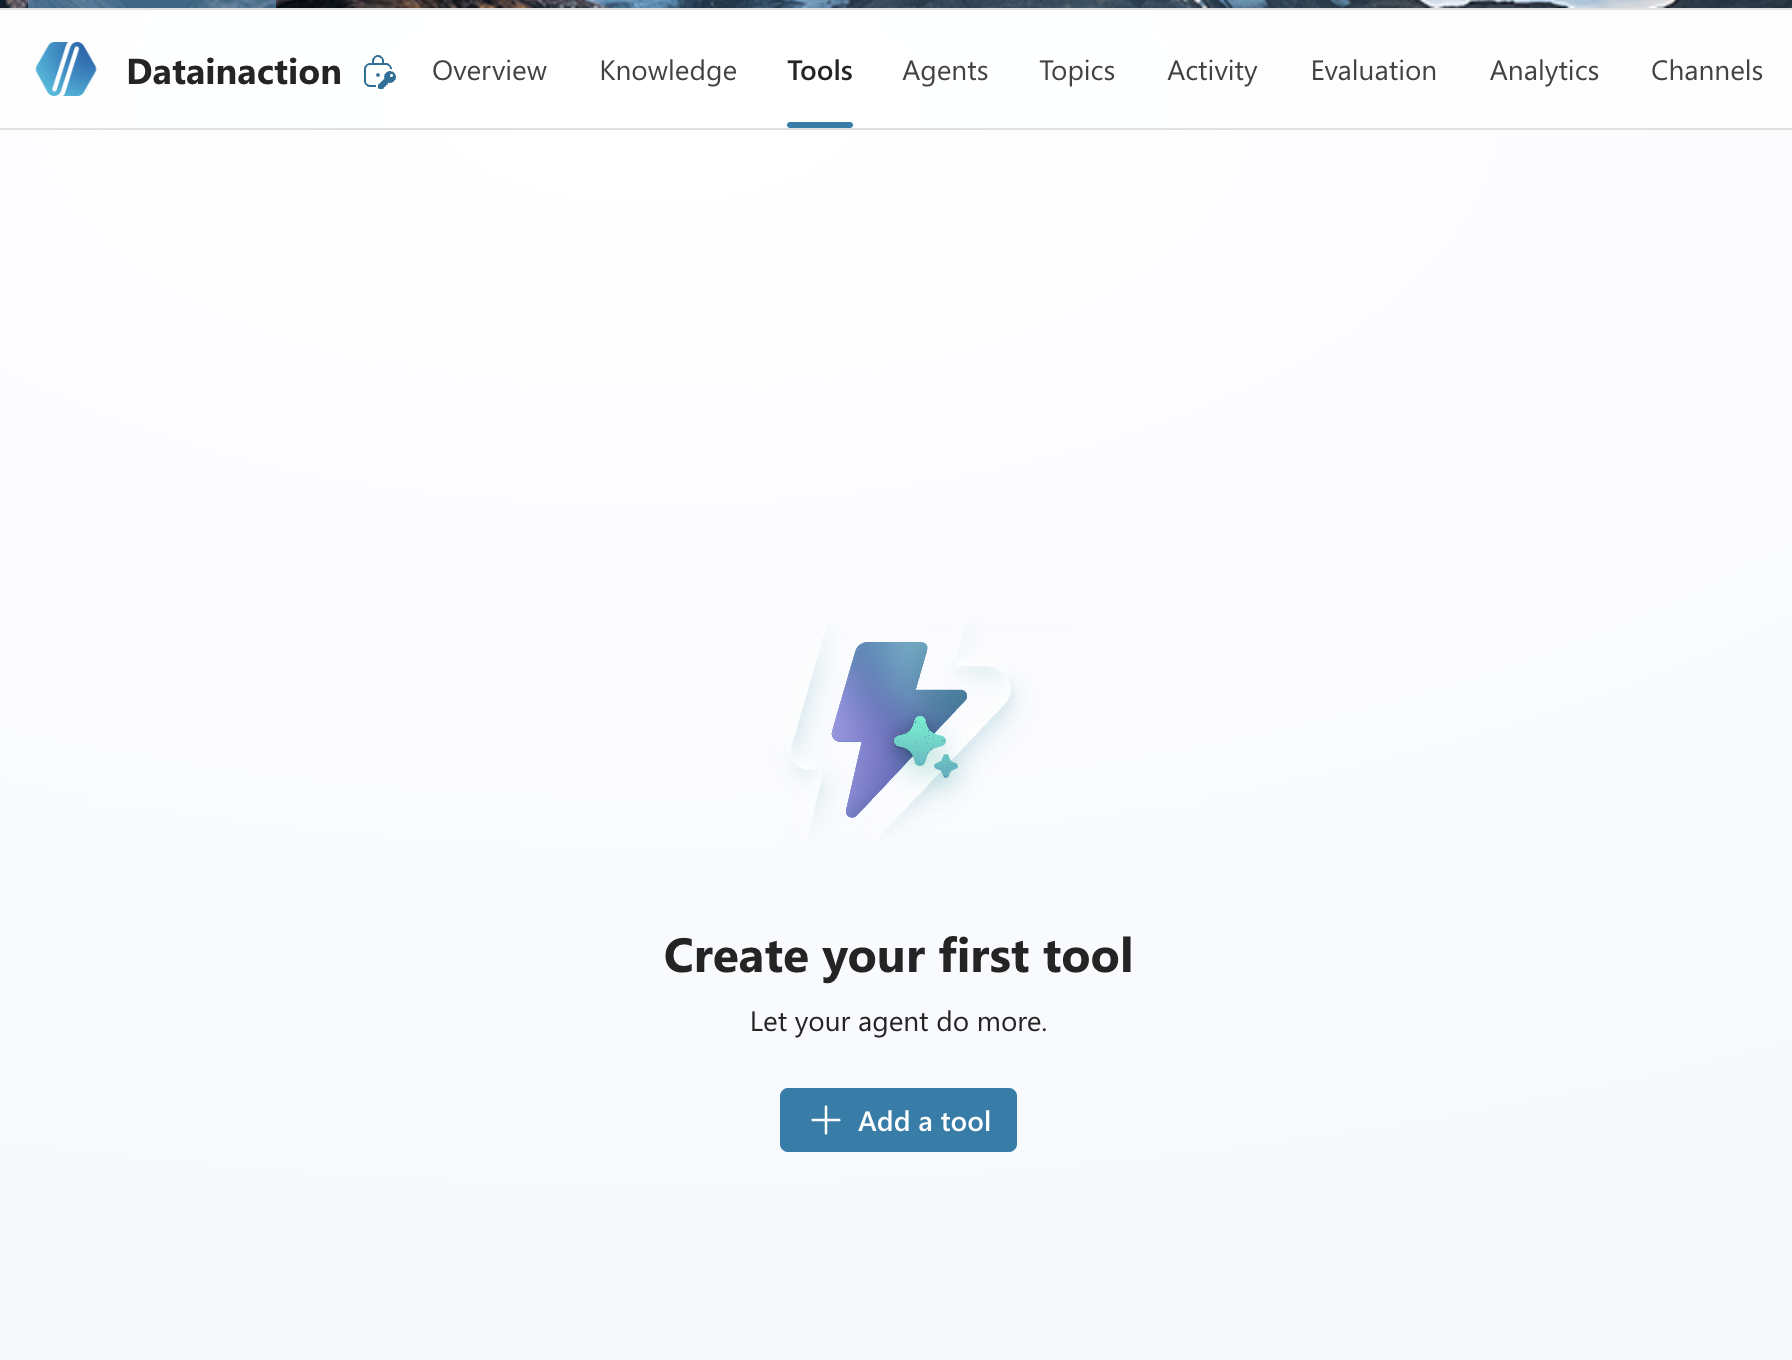
Você clica em Add a tool e cai no catálogo, que é a parte legal.
O catálogo por dentro
Olha a tela de Add tool. Ela já te deixa buscar por cenário ("send an email", por exemplo) e, principalmente, filtrar por tipo de tool ali nas abas: Connector, Prompt, Workflows, REST API e Model Context Protocol. Repara que embaixo já aparecem os conectores populares, Outlook, Teams, SharePoint, OneDrive, Excel, Dataverse, Azure Data Explorer, Dynamics 365, e por aí vai.
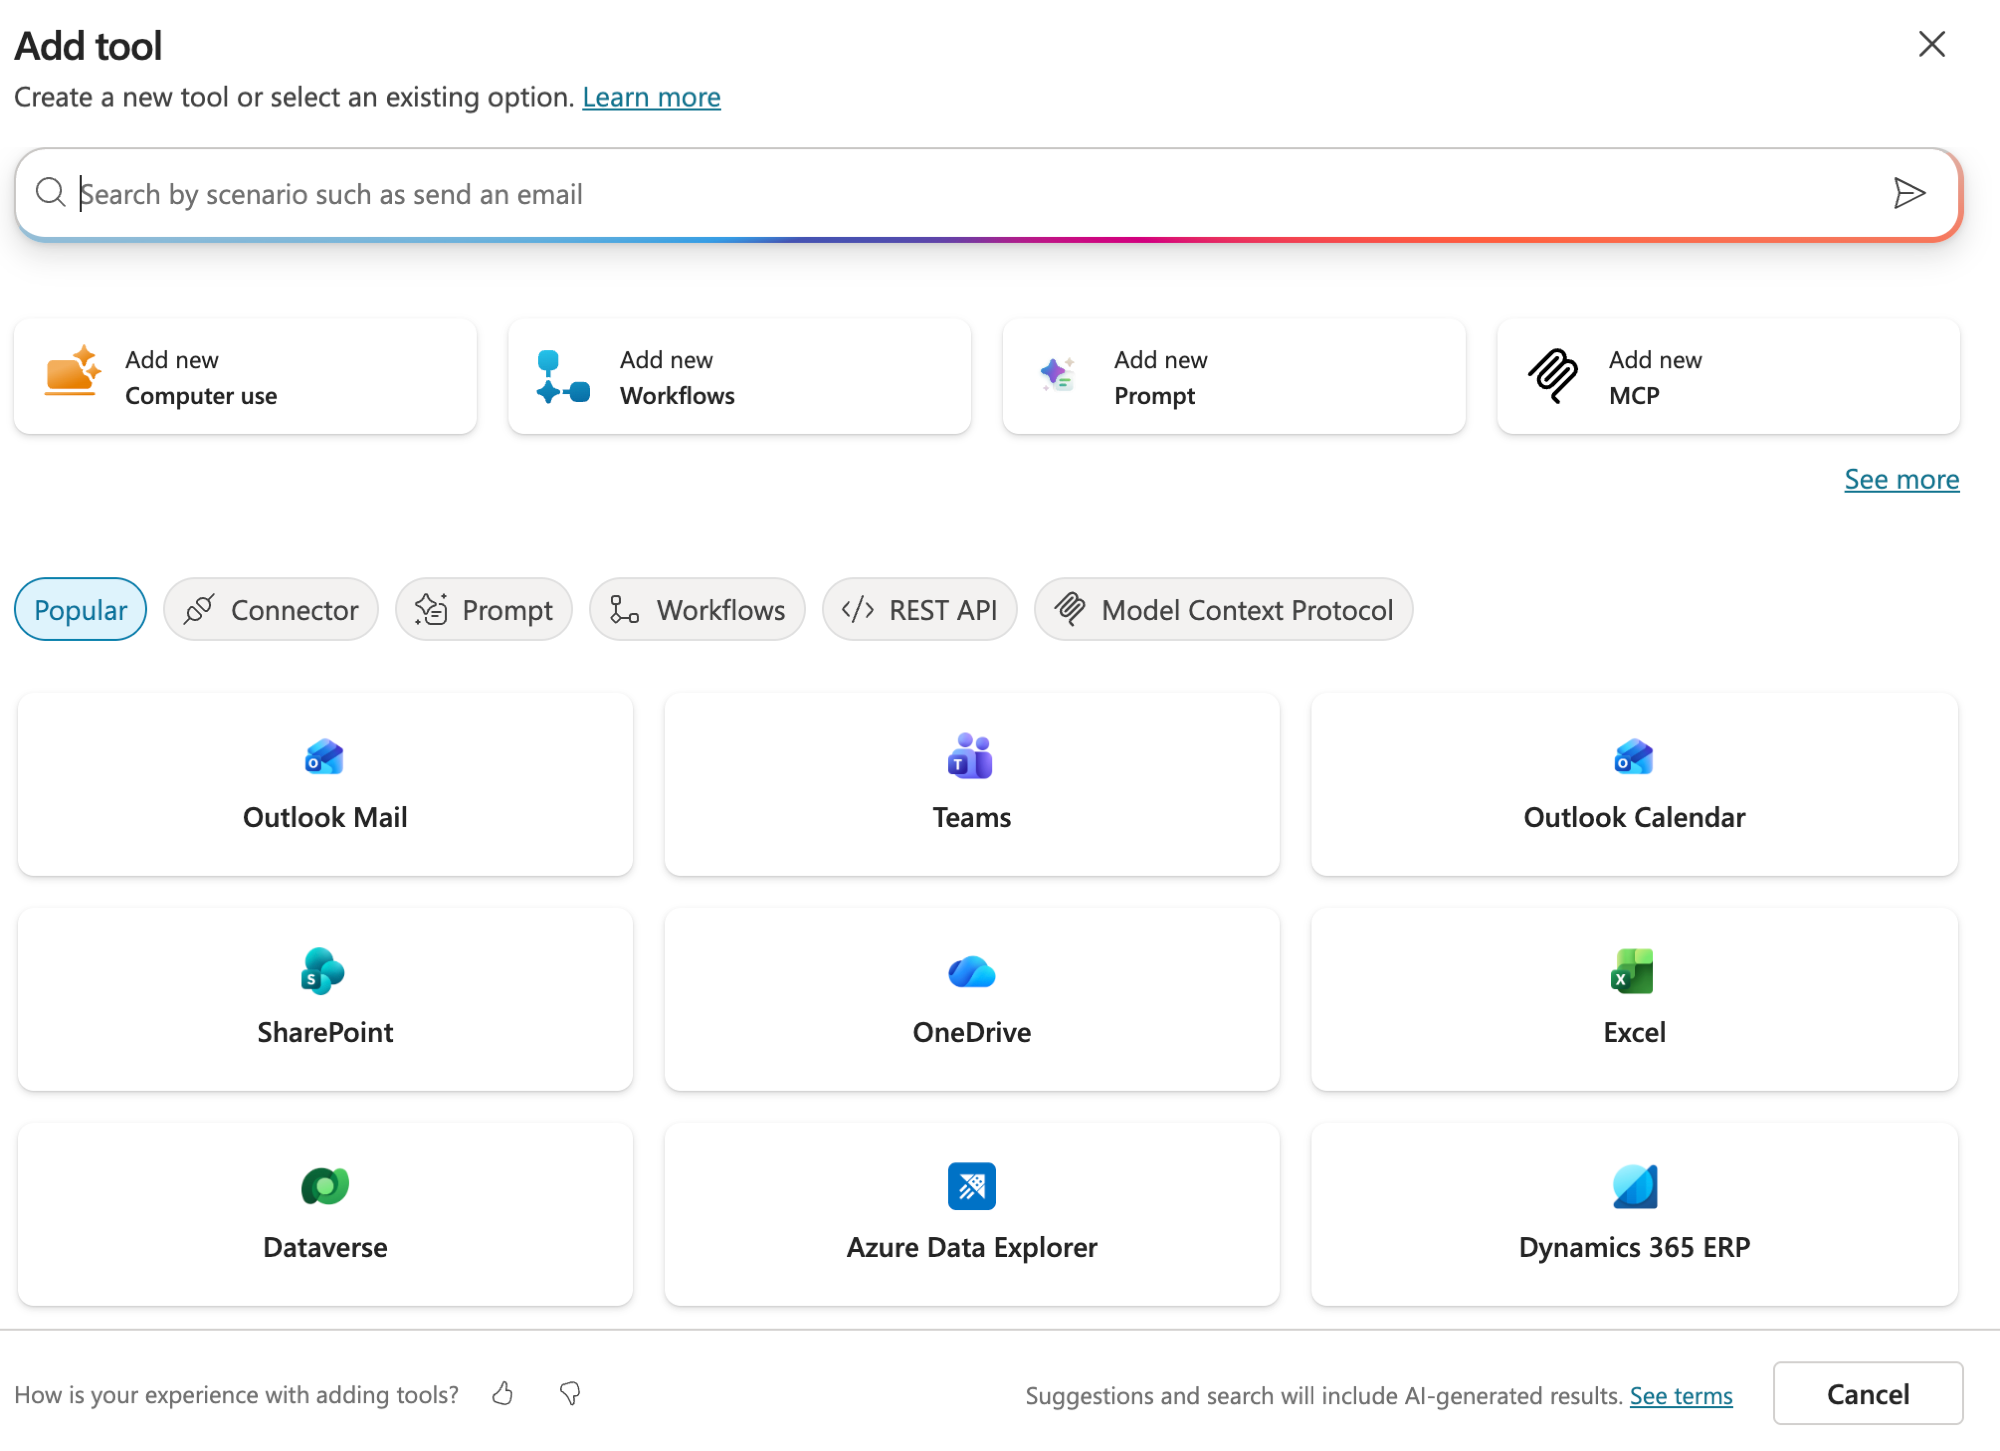
Esse é o ponto central do post: o conector é uma ponte pronta entre o seu agente e um serviço de fora. Em vez de você programar a chamada pro SharePoint, pro SQL Server ou pro Salesforce na mão, alguém já embrulhou aquela API num pacote com autenticação, ações e parâmetros prontos, e você só escolhe e configura.
E o motivo de ter tanto conector é que eles não são exclusivos do Copilot Studio. Esse catálogo é o mesmo do Power Platform, compartilhado com o Power Automate e o Azure Logic Apps. Ou seja, tudo que já existia pra automação nessas ferramentas o seu agente também alcança, e por isso a conta passa de mil conectores. É muita coisa pronta, você raramente vai precisar construir do zero. E quando precisar, tem os outros tipos de tool ali do lado (REST API pra sua própria API e MCP), que são justamente os próximos posts da série.
Antes de continuar: Actions virou Tools
Se você mexeu no Copilot Studio ano passado ou viu tutorial antigo, vai lembrar do termo Actions. A Microsoft renomeou isso pra Tools. É o mesmo conceito, tudo que o agente pode acionar pra executar uma tarefa é uma tool, e conector é um dos tipos de tool que existem (junto de REST API, MCP, Workflows e Prompt, como você viu na tela). Fica esperto porque a doc e a interface já falam Tools, mas muito conteúdo por aí ainda diz Actions. Se você quiser relembrar onde a tool se encaixa dentro do agente, eu montei isso no post de anatomia de um agente.
Os 3 tipos de conector
Antes de sair plugando, vale saber que os conectores vêm em três sabores, e isso mexe no seu bolso e na sua liberdade:
Standard: os que vêm inclusos no plano, tipo SharePoint, Outlook, Teams, OneDrive. Sem custo extra.
Premium: os mais pesados de integração corporativa, como SQL Server, Salesforce, Dataverse, Oracle. Precisam de licença Premium do Power Platform pra rodar em produção.
Custom: quando não existe conector pronto pro serviço que você quer, você cria o seu apontando pra qualquer API pública. Esse é o assunto do próximo post, com REST e OpenAPI.
O ponto de atenção aqui é o premium. SQL Server, que é o exemplo mais pedido, é premium, então antes de prometer pro time que o agente vai consultar o banco, confirme a licença. Nada pior que montar tudo e travar no licenciamento na hora de publicar.
Demo: adicionando e testando uma tool de verdade
Chega de teoria, bora ver funcionando. Pra demo eu adicionei uma tool que lê a minha agenda, a Work IQ Calendar. Detalhe honesto: essa aí por baixo roda como MCP, e não como um conector do Power Platform (calma, MCP é o assunto do post [3] dessa série), mas eu trouxe ela de propósito porque o fluxo de adicionar é idêntico pra qualquer coisa do catálogo, conector incluso. Você escolhe a tool, cai numa tela de configuração e, o passo mais importante, define a Connection:
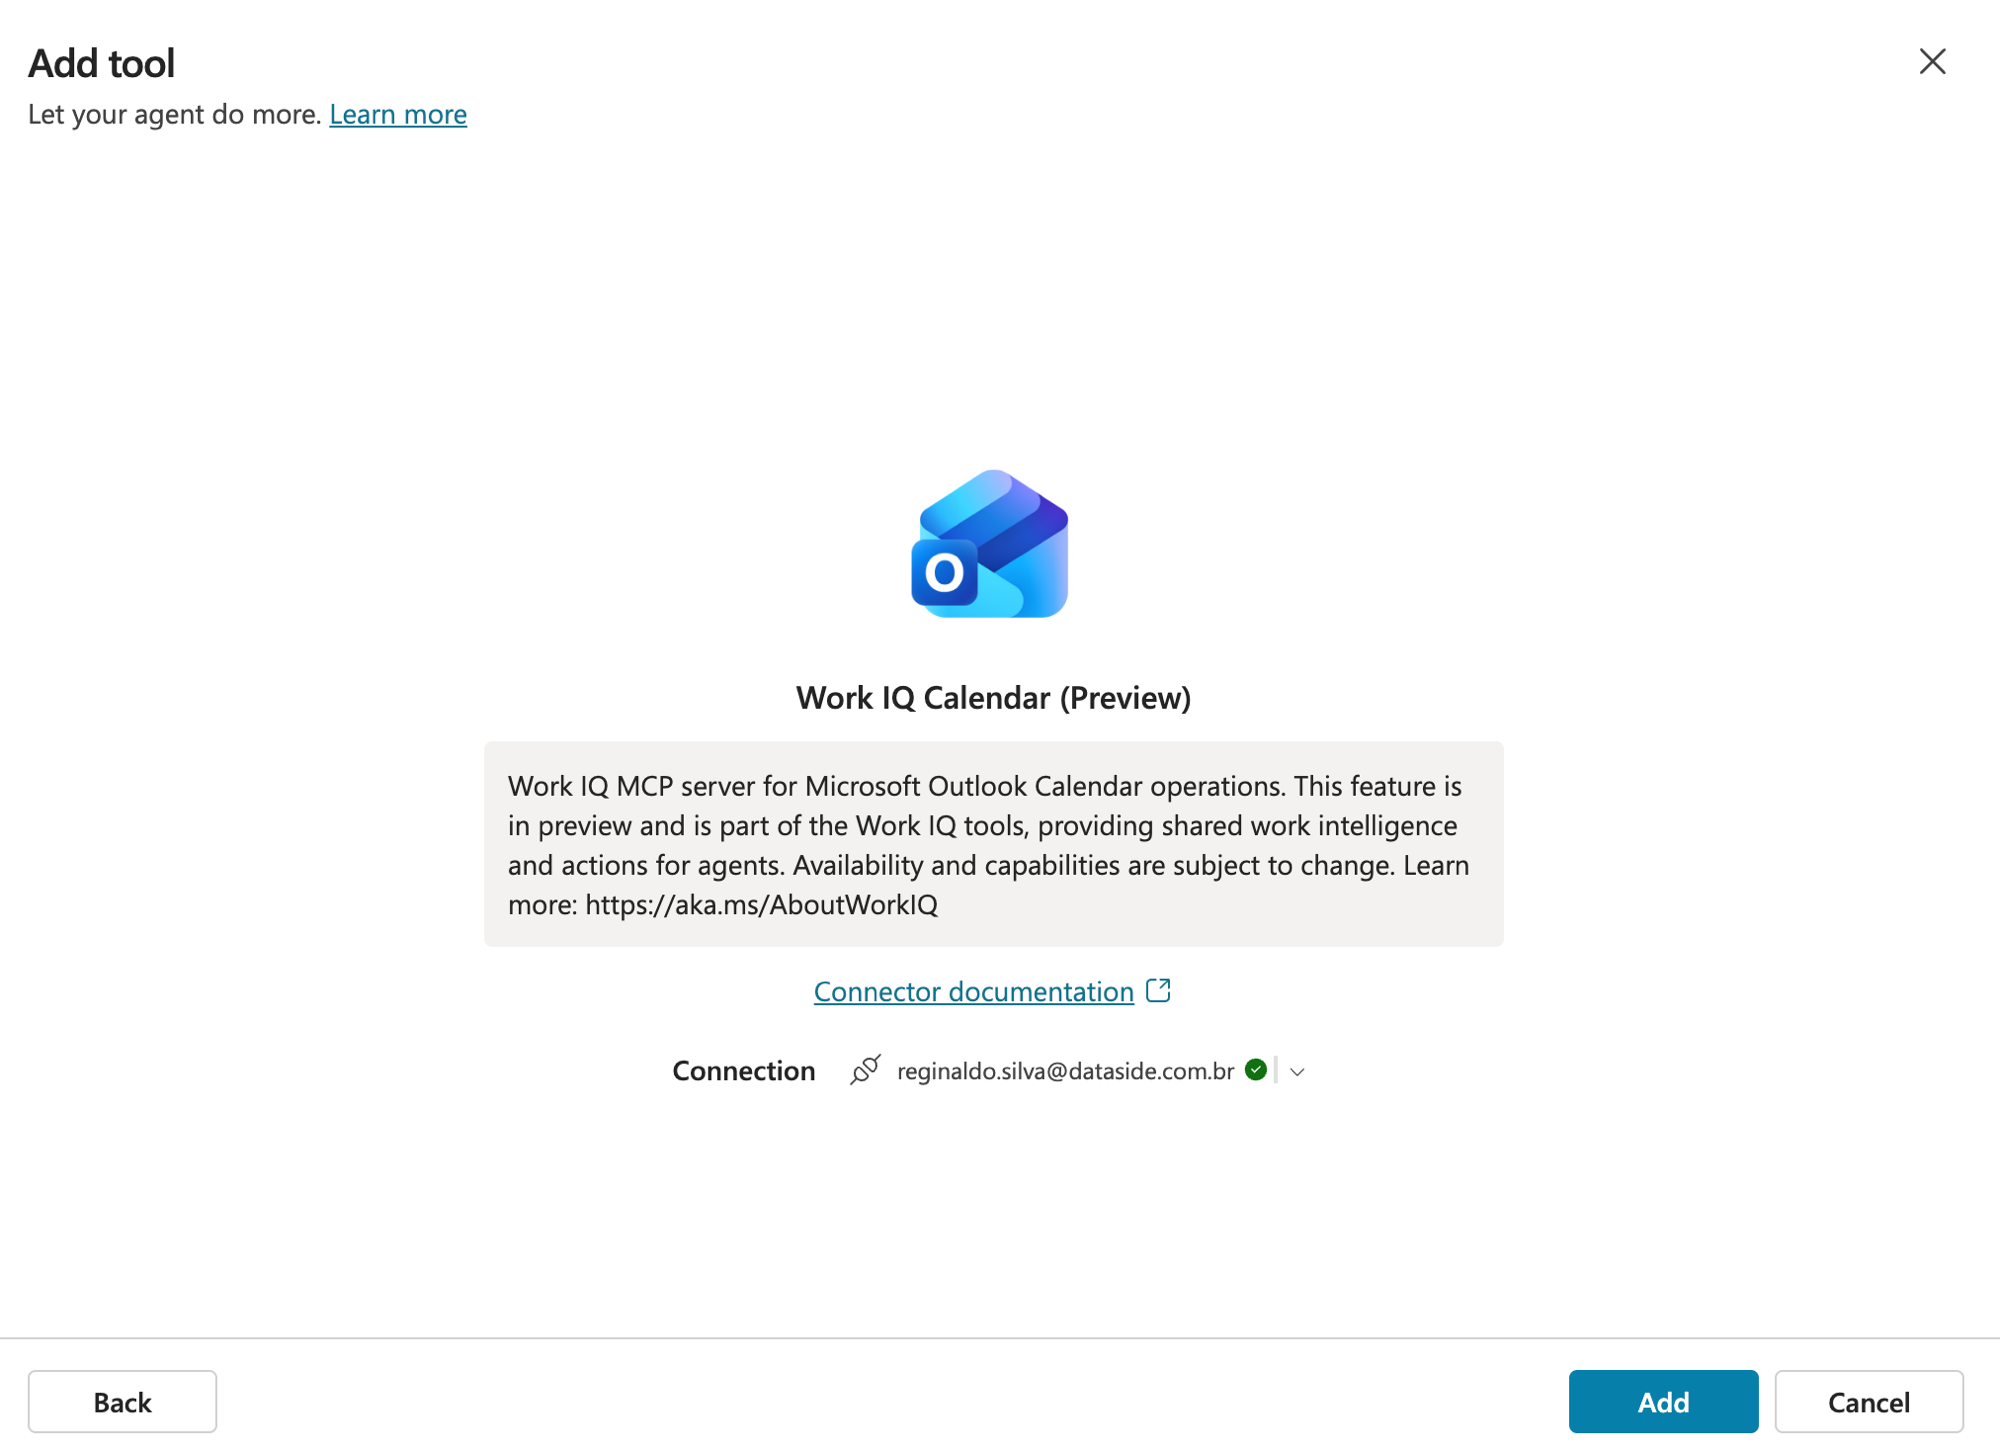
Aqui já dá pra ver a conexão ligada na minha conta com o certinho verde, é ela que autoriza o agente a bater na API do outro lado. Dou Add e a tool entra na lista:
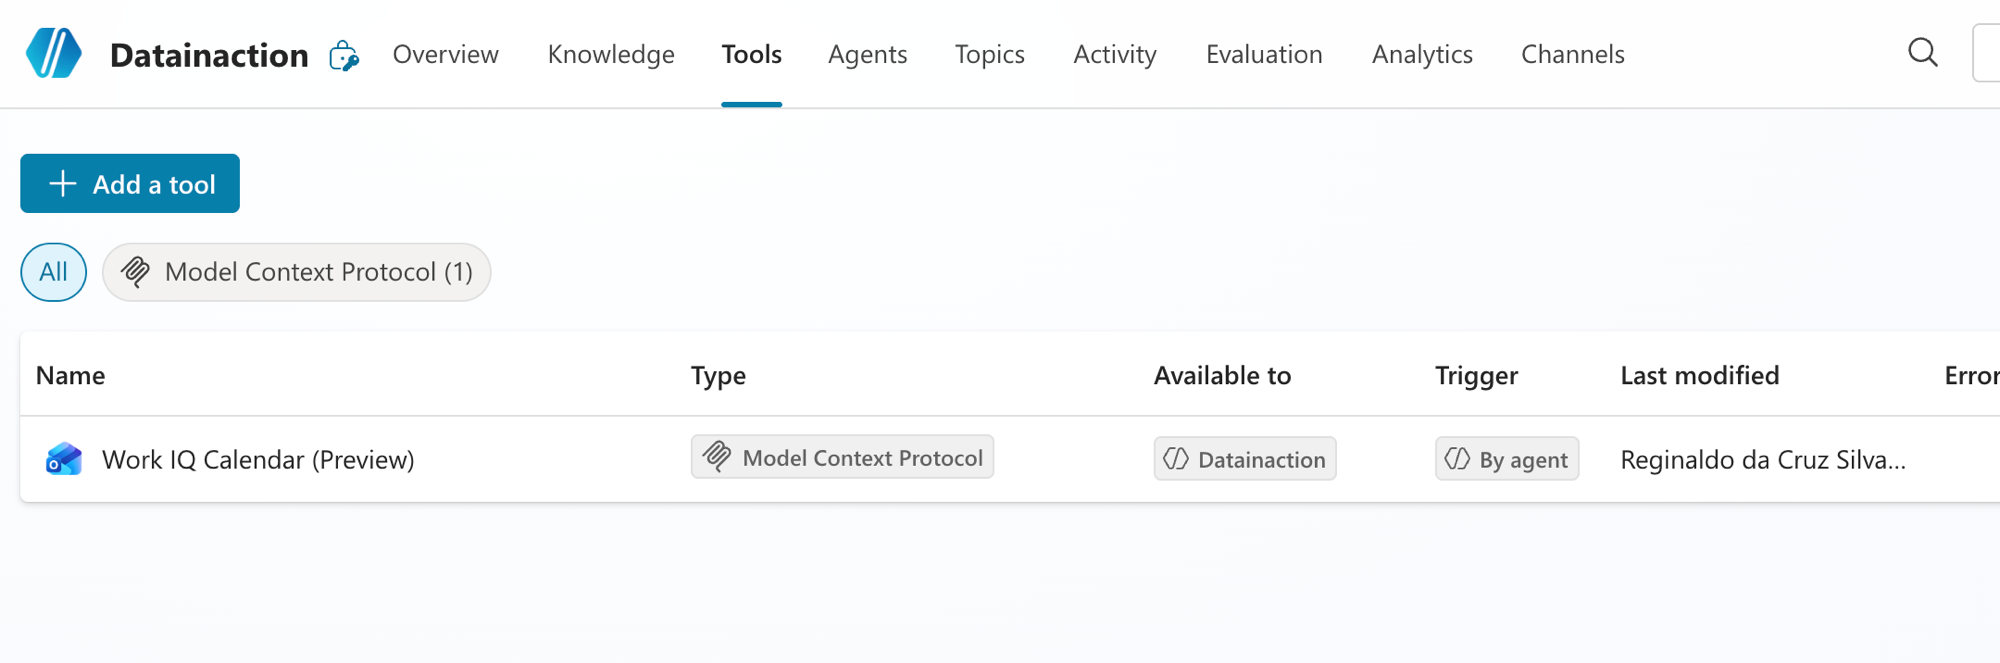
Repara nas colunas dessa lista, elas dizem muito: Type (aqui, Model Context Protocol), Available to (a qual agente a tool está disponível) e Trigger como By agent, ou seja, quem decide acionar a tool é o próprio agente na hora que achar que precisa. Segura essa informação que ela liga direto na última seção.
Agora o momento que vale o post: abri o Test your agent e pedi a minha agenda. Sem eu programar nada, o agente sozinho escolheu a tool, chamou a operação ListCalendarView, passou os parâmetros (data inicial, timezone) e voltou com o resultado, tudo em 1,52s:
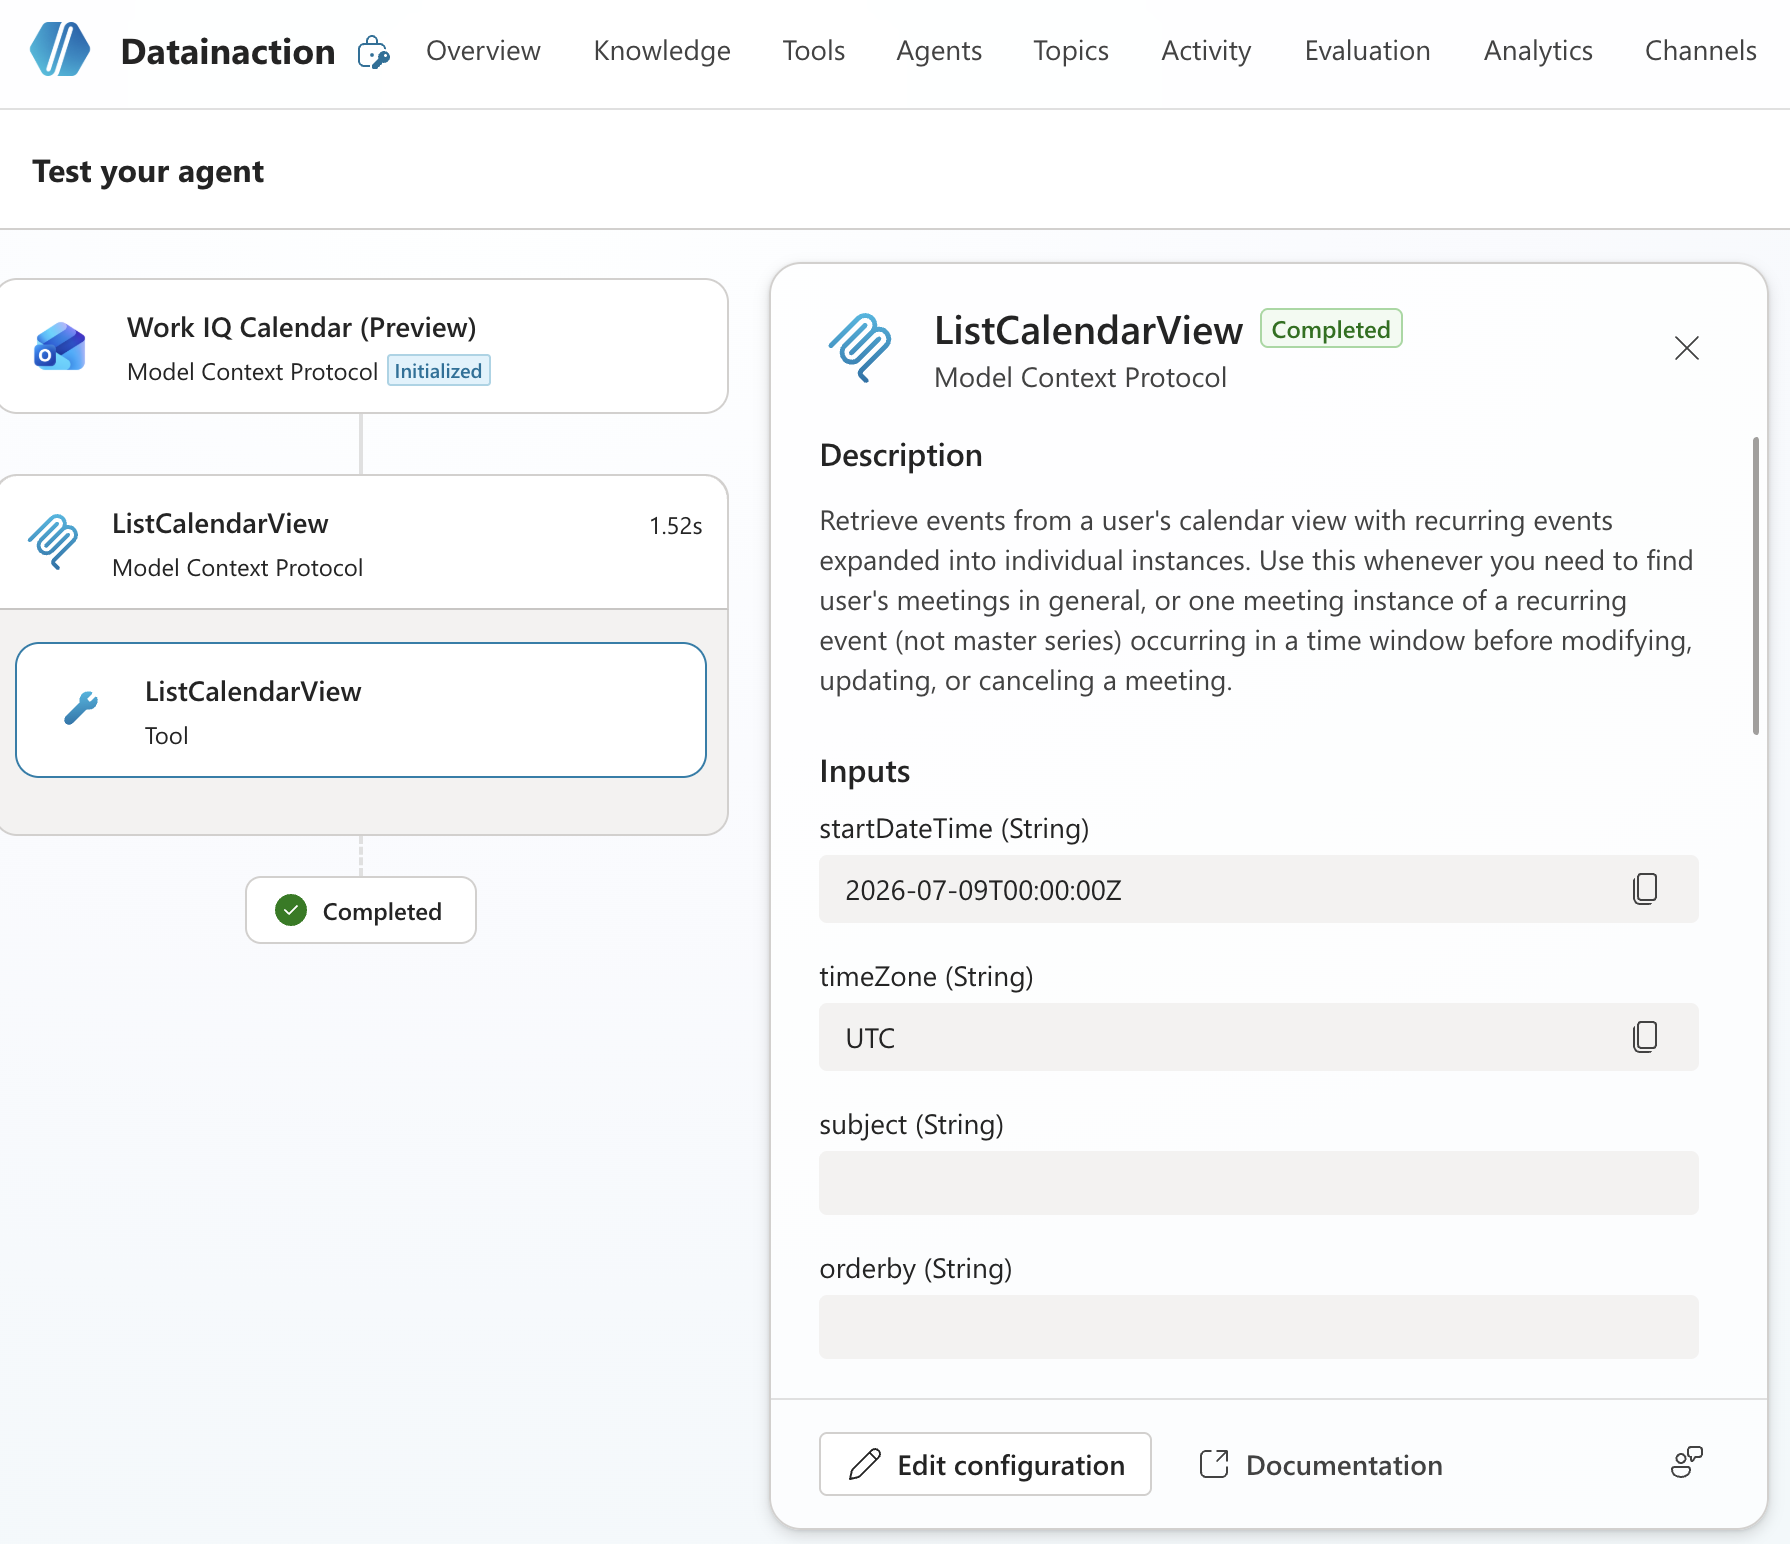
Esse mapa de atividade do lado esquerdo é ouro pra depurar: você vê a tool sendo inicializada, a operação rodando e o Completed no fim. É assim que você confirma que a tool está sendo chamada de verdade.
Autenticação: quem chama a API
Aquela tela de Connection não é só um detalhe, é a decisão de segurança mais importante da tool. Você precisa definir com qual credencial ela vai bater na API lá do outro lado, e tem dois caminhos:
Credencial do usuário (o padrão): cada pessoa que conversa com o agente autentica com a própria conta. É o mais seguro, porque o usuário só enxerga o que ele já teria permissão de ver no sistema de origem. No meu caso da agenda, cada um veria a própria agenda, não a minha.
Credencial do maker (você): o agente usa a SUA conexão pra todo mundo. Na tela é o Maker-provided credentials, que você liga nos detalhes da tool. Serve pra cenário em que o usuário final não tem (nem deveria ter) acesso direto à fonte, mas o agente responde por ele.
Reginaldo, e qual eu escolho?
Depende de quem pode ver o quê. Se o dado é sensível e cada pessoa tem um nível de acesso diferente, fica na credencial do usuário e deixa o sistema de origem fazer o controle. Se é um dado comum a todos e você quer padronizar a resposta, credencial do maker resolve, mas aí a responsabilidade de expor aquilo é sua, então pensa bem antes.
A descrição é o que o modelo lê
Tem um detalhe que faz toda a diferença e muita gente pula: a descrição da tool. Quando o agente está em orquestração generativa, é o modelo que decide sozinho quando chamar cada tool, e ele decide lendo o nome e a descrição. Olha de novo o print do teste: a operação ListCalendarView tem uma descrição que diz "Retrieve events from a user's calendar view... Use this whenever you need to find user's meetings". Foi essa frase que fez o modelo entender que, quando eu pedi a agenda, era essa tool que devia ser chamada.
Ou seja, se você deixa a descrição genérica ou vazia, o agente não sabe quando usar aquilo e a tool fica lá parada. Então escreva de verdade o que a tool faz e quando ela deve ser acionada, tipo "use isto para buscar o status de um pedido pelo número". Isso é metade do sucesso.
RESUMO
A aba Tools é onde o agente ganha capacidades. Clica em Add a tool e você cai no catálogo.
O catálogo filtra por Connector, REST API, MCP, Workflows e Prompt. Conector é uma ponte pronta pra um serviço externo, e o catálogo é o do Power Platform (o mesmo do Power Automate e Logic Apps), por isso passa de 1000.
Actions virou Tools. Conector é um dos tipos de tool.
Três tipos de conector: standard (inclusos), premium (SQL Server, Salesforce, precisa de licença) e custom (você cria apontando pra uma API pública).
Na demo o agente sozinho chamou a tool no Test your agent e o mapa de atividade mostrou o passo a passo. O Trigger By agent é isso: quem decide acionar é o modelo.
Autenticação: credencial do usuário (padrão, respeita o acesso de cada um) ou credencial do maker (a sua, pra todos).
Capriche na descrição da tool, é ela que o modelo lê pra decidir quando chamar.
Com o conector pronto você já cobre um monte de integração sem código. No próximo post da série a gente sai do catálogo e cria uma tool do zero apontando pra uma API nossa com REST e OpenAPI, que é quando o conector pronto não existe e você precisa fazer o seu.
Referências:
https://learn.microsoft.com/en-us/microsoft-copilot-studio/advanced-connectors
https://learn.microsoft.com/en-us/microsoft-copilot-studio/add-tools-custom-agent
Fique bem e até a próxima.
#copilotstudio #connectors #powerplatform #ia #agentes #datainaction
Hey dataholics! New week and a new series here. Last week we spent the whole time on Knowledge, that is, on how the agent reads and searches for information. Now we flip the switch: in this series I want to show how the agent gets things done, queries a database, reads your calendar, calls an API, fires off a flow. And the fastest way to hand your agent that ability is through Tools, especially the Power Platform connector catalog, more than a thousand of them ready to go. Today is the opening post: what this catalog is, how a connector becomes an agent tool, and an end-to-end demo I ran on my Datainaction agent.
What we'll cover in this post:
The Tools tab and your first tool
The catalog up close (and why there are more than 1000)
A quick word on the name: Actions became Tools
The 3 types of connector: standard, premium and custom
Demo: adding and testing a real tool
Authentication: who calls the API, you or the user
The description is what the model reads
Summary
The Tools tab and your first tool
Every new agent in Copilot Studio is born with an empty Tools tab, with that nice little invite: "Create your first tool. Let your agent do more". This is where we start from, it's literally where you give the agent superpowers.
You click Add a tool and land in the catalog, which is the fun part.
The catalog up close
Look at the Add tool screen. It already lets you search by scenario ("send an email", for example) and, more importantly, filter by tool type in those tabs: Connector, Prompt, Workflows, REST API and Model Context Protocol. Notice that the popular connectors already show up below, Outlook, Teams, SharePoint, OneDrive, Excel, Dataverse, Azure Data Explorer, Dynamics 365, and so on.
This is the central point of the post: a connector is a ready-made bridge between your agent and an outside service. Instead of you coding the call to SharePoint, SQL Server or Salesforce by hand, someone already wrapped that API into a package with authentication, actions and parameters all set, and you just pick it and configure it.
And the reason there are so many connectors is that they aren't exclusive to Copilot Studio. This catalog is the same one from Power Platform, shared with Power Automate and Azure Logic Apps. So everything that already existed for automation in those tools your agent can reach too, and that's why the count goes past a thousand connectors. That's a lot ready to go, you'll rarely need to build one from scratch. And when you do need to, the other tool types are right there next to it (REST API for your own API and MCP), which are exactly the next posts in the series.
Before we go on: Actions became Tools
If you touched Copilot Studio last year or watched an old tutorial, you'll remember the term Actions. Microsoft renamed it to Tools. It's the same concept, anything the agent can trigger to carry out a task is a tool, and a connector is one of the types of tool out there (along with REST API, MCP, Workflows and Prompt, as you saw on the screen). Keep an eye out, because the docs and the interface already say Tools, but a lot of content around still says Actions. If you want a refresher on where the tool fits inside the agent, I put that together in the anatomy of an agent post.
The 3 types of connector
Before you go plugging things in, it's worth knowing that connectors come in three flavors, and that affects your wallet and your freedom:
Standard: the ones included in the plan, like SharePoint, Outlook, Teams, OneDrive. No extra cost.
Premium: the heavier enterprise integration ones, like SQL Server, Salesforce, Dataverse, Oracle. They need a Power Platform Premium license to run in production.
Custom: when there's no ready connector for the service you want, you create your own pointing at any public API. That's the topic of the next post, with REST and OpenAPI.
The thing to watch here is premium. SQL Server, which is the most requested example, is premium, so before you promise the team the agent will query the database, confirm the license. Nothing worse than building it all and getting stuck on licensing right at publish time.
Demo: adding and testing a real tool
Enough theory, let's see it working. For the demo I added a tool that reads my calendar, Work IQ Calendar. An honest detail: this one runs as MCP under the hood, not as a Power Platform connector (don't worry, MCP is the topic of post [3] in this series), but I brought it on purpose because the flow to add it is identical for anything in the catalog, connectors included. You pick the tool, land on a configuration screen and, the most important step, set the Connection:
Here you can already see the connection tied to my account with the green check, and it's what authorizes the agent to hit the API on the other side. I hit Add and the tool goes into the list:
Notice the columns in this list, they say a lot: Type (here, Model Context Protocol), Available to (which agent the tool is available to) and Trigger as By agent, that is, the one who decides to call the tool is the agent itself, whenever it thinks it needs to. Hold on to that, because it ties straight into the last section.
Now the moment that makes the post worth it: I opened Test your agent and asked for my calendar. Without me programming anything, the agent on its own picked the tool, called the ListCalendarView operation, passed the parameters (start date, timezone) and came back with the result, all in 1.52s:
That activity map on the left is gold for debugging: you see the tool being initialized, the operation running and the Completed at the end. That's how you confirm the tool is actually being called.
Authentication: who calls the API
That Connection screen isn't just a detail, it's the most important security decision of the tool. You have to set which credential it will hit the API with on the other side, and there are two paths:
User credentials (the default): each person who talks to the agent authenticates with their own account. It's the safest, because the user only sees what they'd already have permission to see in the source system. In my calendar case, each person would see their own calendar, not mine.
Maker credentials (you): the agent uses YOUR connection for everyone. On the screen it's Maker-provided credentials, which you turn on in the tool's details. It's for the scenario where the end user doesn't have (and shouldn't have) direct access to the source, but the agent answers on their behalf.
Reginaldo, so which one do I pick?
It depends on who gets to see what. If the data is sensitive and each person has a different access level, stick with user credentials and let the source system do the control. If it's data common to everyone and you want to standardize the answer, maker credentials solves it, but then the responsibility of exposing that is yours, so think it through first.
The description is what the model reads
There's one detail that makes all the difference and a lot of people skip: the tool's description. When the agent is on generative orchestration, it's the model that decides on its own when to call each tool, and it decides by reading the name and the description. Look at the test screenshot again: the ListCalendarView operation has a description that says "Retrieve events from a user's calendar view... Use this whenever you need to find user's meetings". That sentence is what made the model understand that, when I asked for my calendar, this was the tool to call.
In other words, if you leave the description generic or empty, the agent doesn't know when to use that thing and the tool just sits there. So actually write what the tool does and when it should be triggered, like "use this to look up an order's status by its number". That's half the success right there.
RECAP
The Tools tab is where the agent gains capabilities. Click Add a tool and you land in the catalog.
The catalog filters by Connector, REST API, MCP, Workflows and Prompt. A connector is a ready-made bridge to an external service, and the catalog is the Power Platform one (the same as Power Automate and Logic Apps), which is why it goes past 1000.
Actions became Tools. A connector is one of the tool types.
Three types of connector: standard (included), premium (SQL Server, Salesforce, needs a license) and custom (you create it pointing at a public API).
In the demo the agent called the tool on its own in Test your agent and the activity map showed the step by step. The Trigger By agent is exactly that: the model decides when to call it.
Authentication: user credentials (default, respects each person's access) or maker credentials (yours, for everyone).
Take care with the tool's description, it's what the model reads to decide when to call it.
With the connector in place you already cover a ton of integration with no code. In the next post of the series we leave the catalog and create a tool from scratch pointing at an API of ours with REST and OpenAPI, which is for when the ready connector doesn't exist and you have to make your own.
References:
https://learn.microsoft.com/en-us/microsoft-copilot-studio/advanced-connectors
https://learn.microsoft.com/en-us/microsoft-copilot-studio/add-tools-custom-agent
Stay well and see you next time.
#copilotstudio #connectors #powerplatform #ai #agents #datainaction
Gostou? Tem mais no YouTube e no LinkedIn.
Enjoyed it? There's more on YouTube and LinkedIn.
Continue lendo Keep reading
![GitHub Copilot a fundo [5] - AI Credits: o Copilot virou usage-based](/images/ghcopilot-aicredits-capa.png)
GitHub Copilot a fundo [5] - AI Credits: o Copilot virou usage-based
Ler → Read →![GitHub Copilot a fundo [4] - Copilot CLI: o agente que mora no seu terminal](/images/ghcopilot-cli-capa.png)
GitHub Copilot a fundo [4] - Copilot CLI: o agente que mora no seu terminal
Ler → Read →![GitHub Copilot a fundo [3] - MCP: ferramentas para o agente sem perder a governança](/images/ghcopilot-mcp-capa.png)