IA & Agentes
Copilot Studio - Tools e Conectores [2] - Tools customizadas com REST e OpenAPI
Copilot Studio - Tools & Connectors [2] - Custom tools with REST and OpenAPI
![Copilot Studio - Tools e Conectores [2] - Tools customizadas com REST e OpenAPI](/images/copilot-tools-2-capa.png)
Fala dataholics! Segundo post da série de Tools e, se no post [1] a gente pegou um conector pronto do catálogo, hoje é o cenário oposto: e quando não existe conector pra API que você precisa? Aí você cria o seu, apontando pra qualquer API REST via OpenAPI. E eu não vim só na teoria, criei uma tool do zero em cima da BrasilAPI pra consultar endereço por CEP, testei ao vivo, tomei um erro no caminho e consertei. Vou te levar por todo o fluxo com os prints reais.
O que veremos nesse post:
Quando criar sua própria tool REST
A API da demo: BrasilAPI (CEP), aberta e sem chave
O arquivo OpenAPI que eu subi
O wizard passo a passo: upload, plugin, auth, tools, parâmetros, publish
A tool no catálogo e o "Dynamically fill with AI"
Testando: o erro 404 e o conserto
Resumo
Quando criar sua própria tool REST
No catálogo do Copilot Studio, além do filtro de Connector, tem a aba REST API. Ela existe justamente pro caso em que nenhum dos mil conectores prontos serve, tipo uma API interna da sua empresa ou um serviço público que não tem conector dedicado. Em vez de esperar alguém criar o conector, você descreve a API num arquivo OpenAPI (o velho Swagger) e o Copilot Studio monta a tool a partir dele. É código zero também, o que você precisa é do contrato da API.
Uma coisa que reparei e vale registrar: o wizard fala em API plugin e o cabeçalho ainda menciona "to use with Copilot for Microsoft 365". Ou seja, por baixo dos panos a sua tool REST é publicada como um plugin de API, o mesmo formato que o M365 Copilot usa. Bom saber pra não estranhar a nomenclatura.
A API da demo: BrasilAPI
Pra demo eu queria uma API pública, sem autenticação e que fosse a nossa cara. Escolhi a BrasilAPI, que é aberta, não pede chave e tem OpenAPI publicado. Usei o endpoint de CEP:
GET https://brasilapi.com.br/api/cep/v2/{cep}Ele recebe um CEP de 8 dígitos e devolve estado, cidade, bairro e rua num JSON limpo. Cenário perfeito pra um agente: o usuário manda um CEP e o agente responde o endereço.
O arquivo OpenAPI
Aqui vai um aviso que me poupou tempo depois de apanhar um pouco: aquela tela de upload não aceita colar URL nem texto, ela quer um arquivo OpenAPI 3.0 válido pra dar drag and drop. O spec completo da BrasilAPI é grande e modular, e falhava na validação com um "Invalid OpenAPI specification". Então eu montei um OpenAPI mínimo, só com a operação de CEP, e subi esse. Ficou assim, enxuto:
{
  "openapi": "3.0.3",
  "info": { "title": "BrasilAPI CEP", "version": "1.0.0" },
  "servers": [ { "url": "https://brasilapi.com.br/api" } ],
  "paths": {
    "/cep/v2/{cep}": {
      "get": {
        "operationId": "getCep",
        "summary": "Buscar endereco por CEP",
        "description": "Retorna o endereco de um CEP brasileiro de 8 digitos.",
        "parameters": [
          { "name": "cep", "in": "path", "required": true,
            "schema": { "type": "string" } }
        ],
        "responses": { "200": { "description": "Endereco encontrado" } }
      }
    }
  }
}
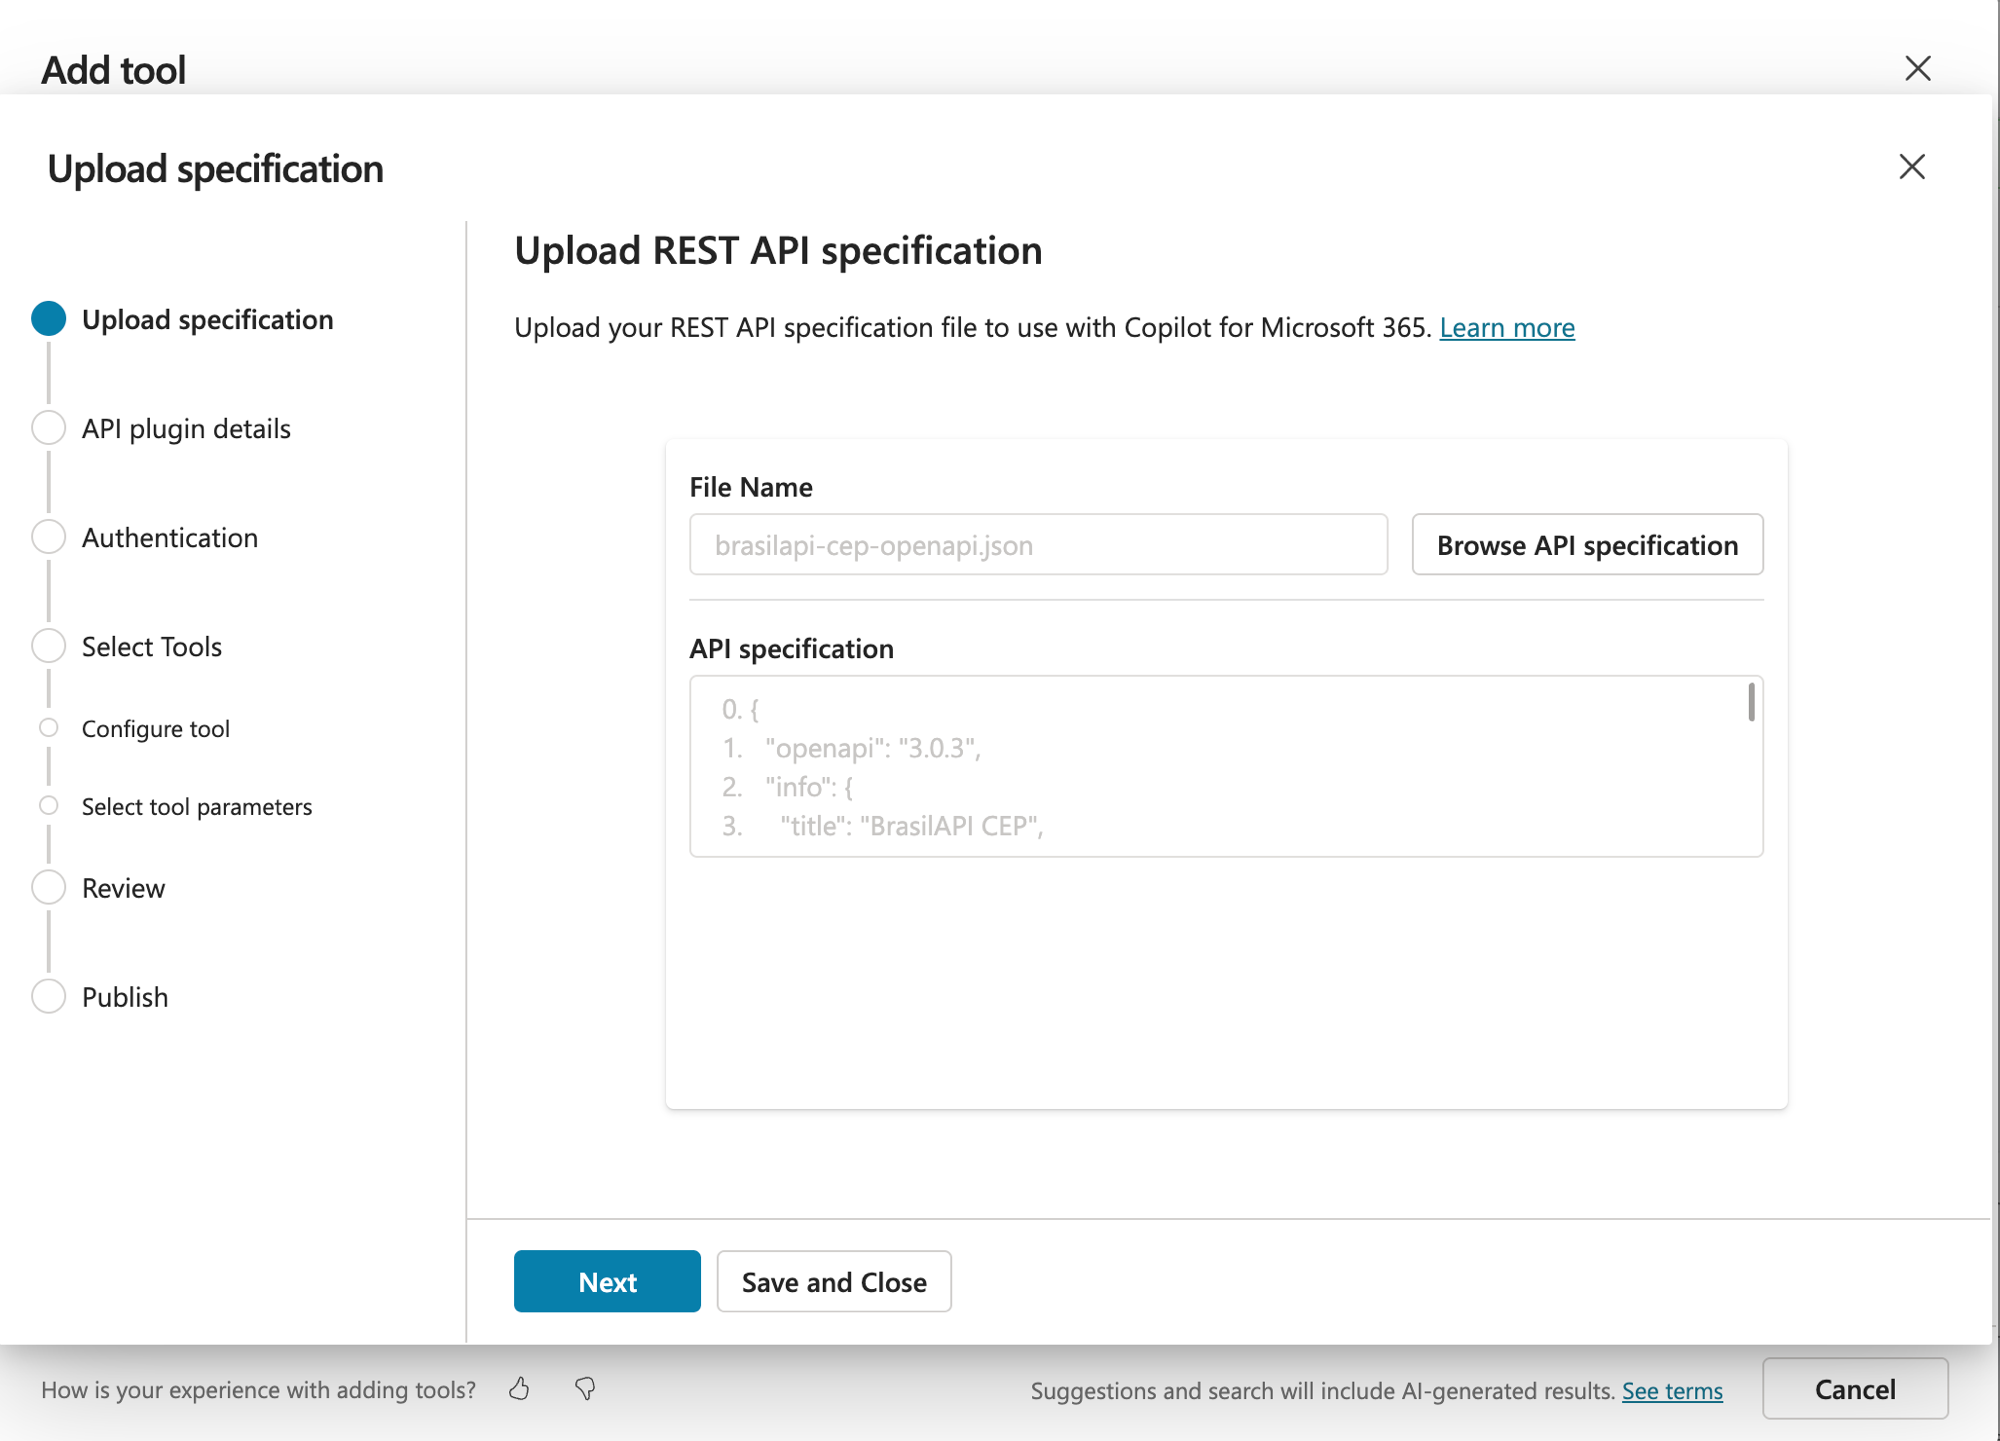
Repara em dois campos que fazem diferença: o operationId (o nome interno da operação) e a description, que como a gente viu no post [1] é o que o modelo lê pra decidir quando chamar a tool. Com o arquivo pronto, é só arrastar:
O wizard passo a passo
Depois do upload, o Copilot Studio te leva por um wizard de 8 etapas (aquela trilha na lateral esquerda). Vou pelos que importam.
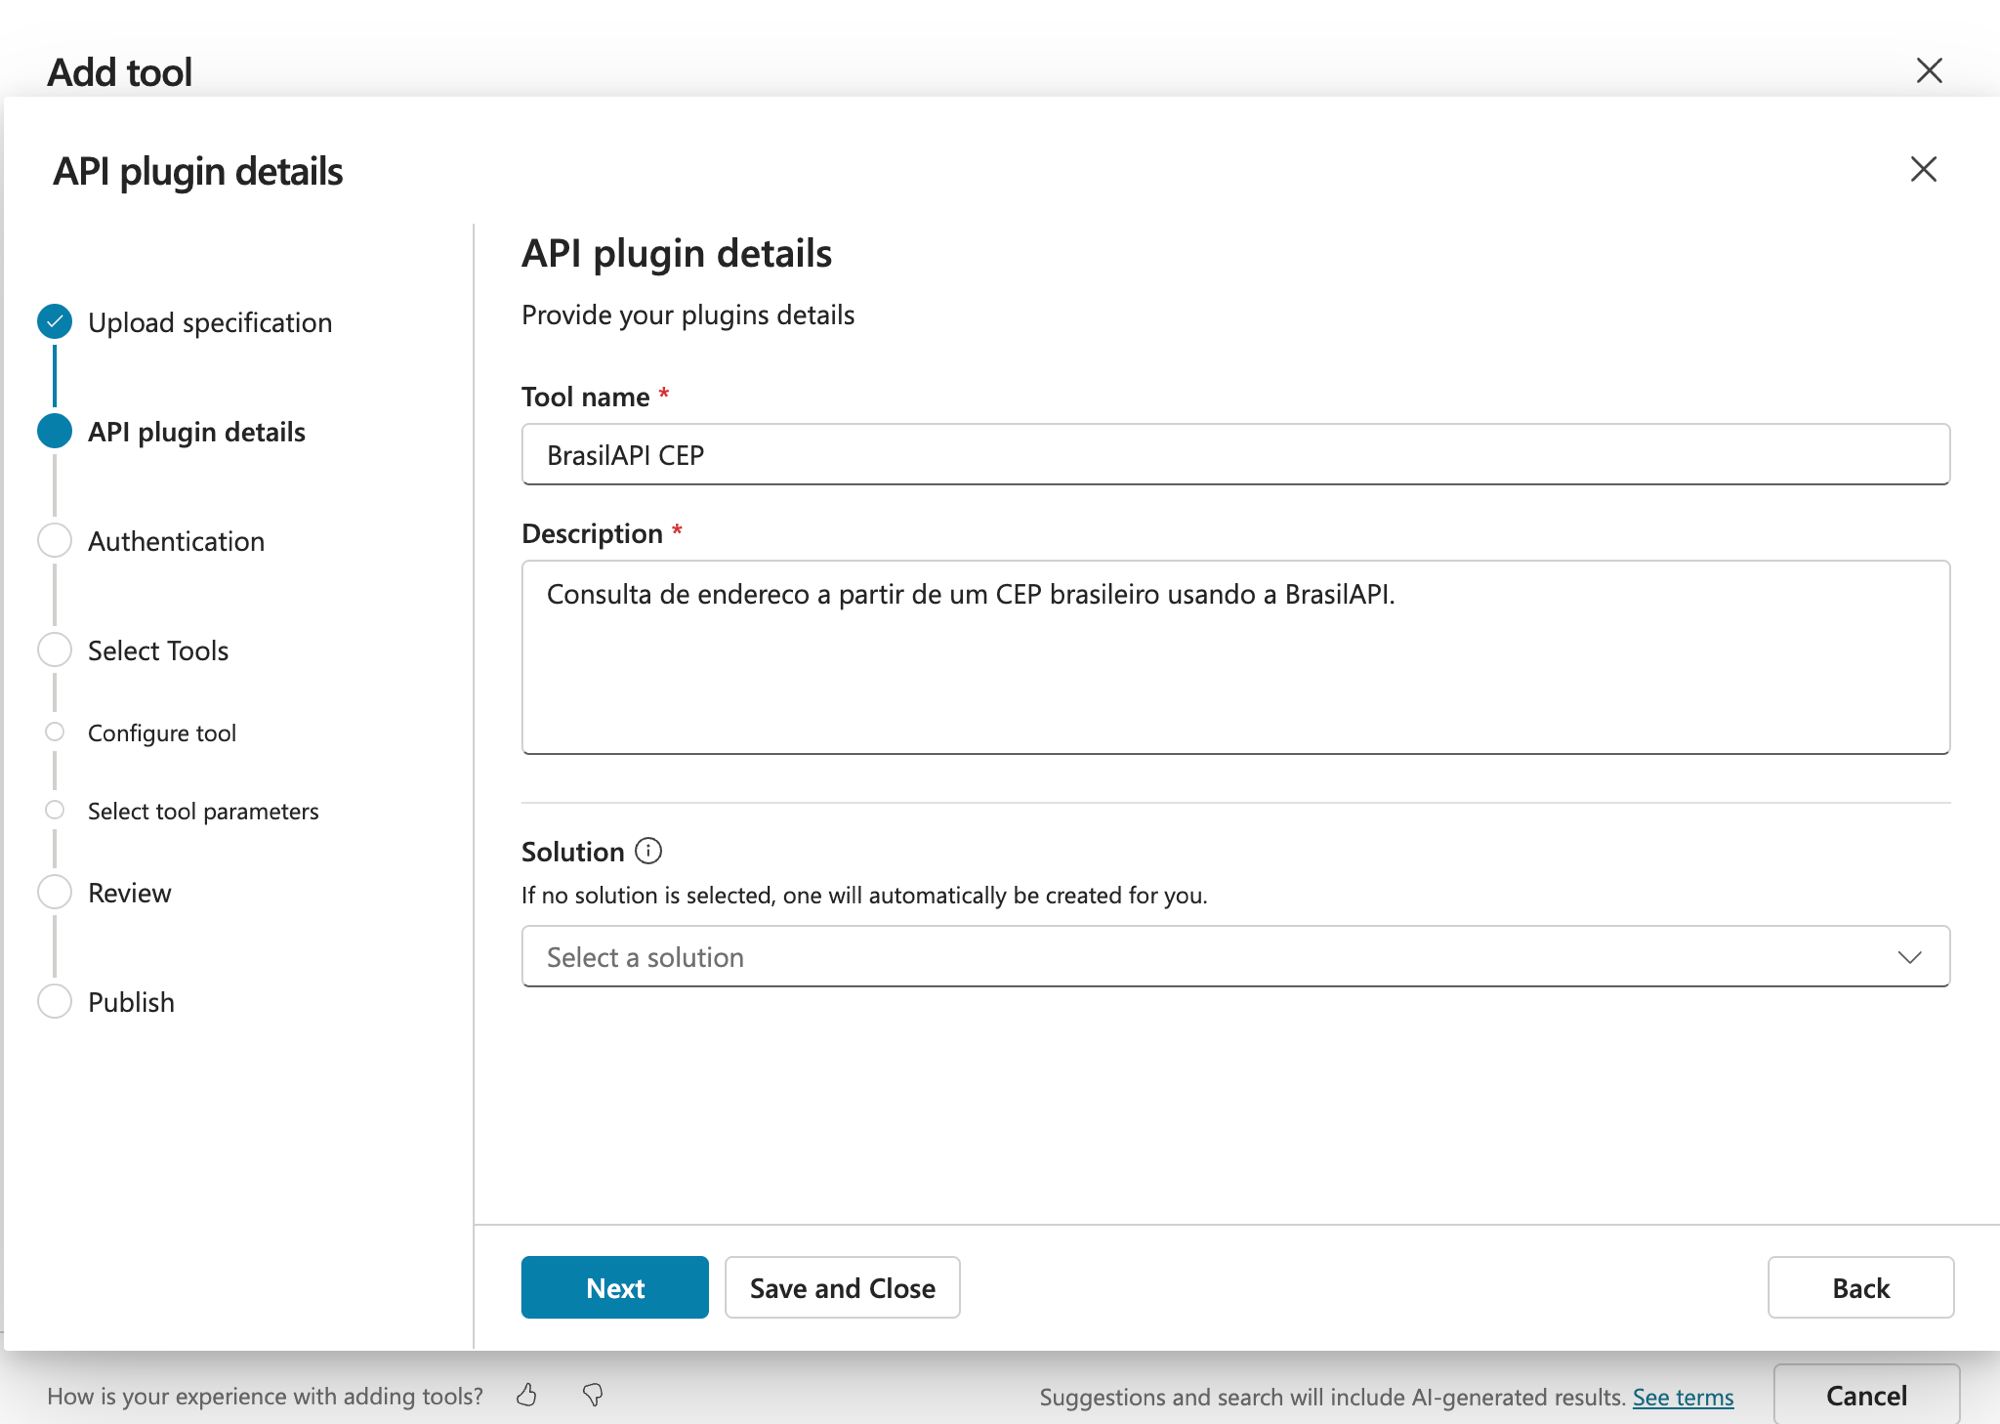
API plugin details: dou nome e descrição pra tool. Botei "BrasilAPI CEP" e uma descrição do que ela faz. O campo Solution pode deixar em branco que ele cria uma solução automática pra você.
A etapa de Authentication foi a mais tranquila justamente porque a BrasilAPI é aberta: escolhi No authentication e segui. Se fosse uma API com chave, seria aqui que você configuraria o API Key ou o OAuth 2.0.
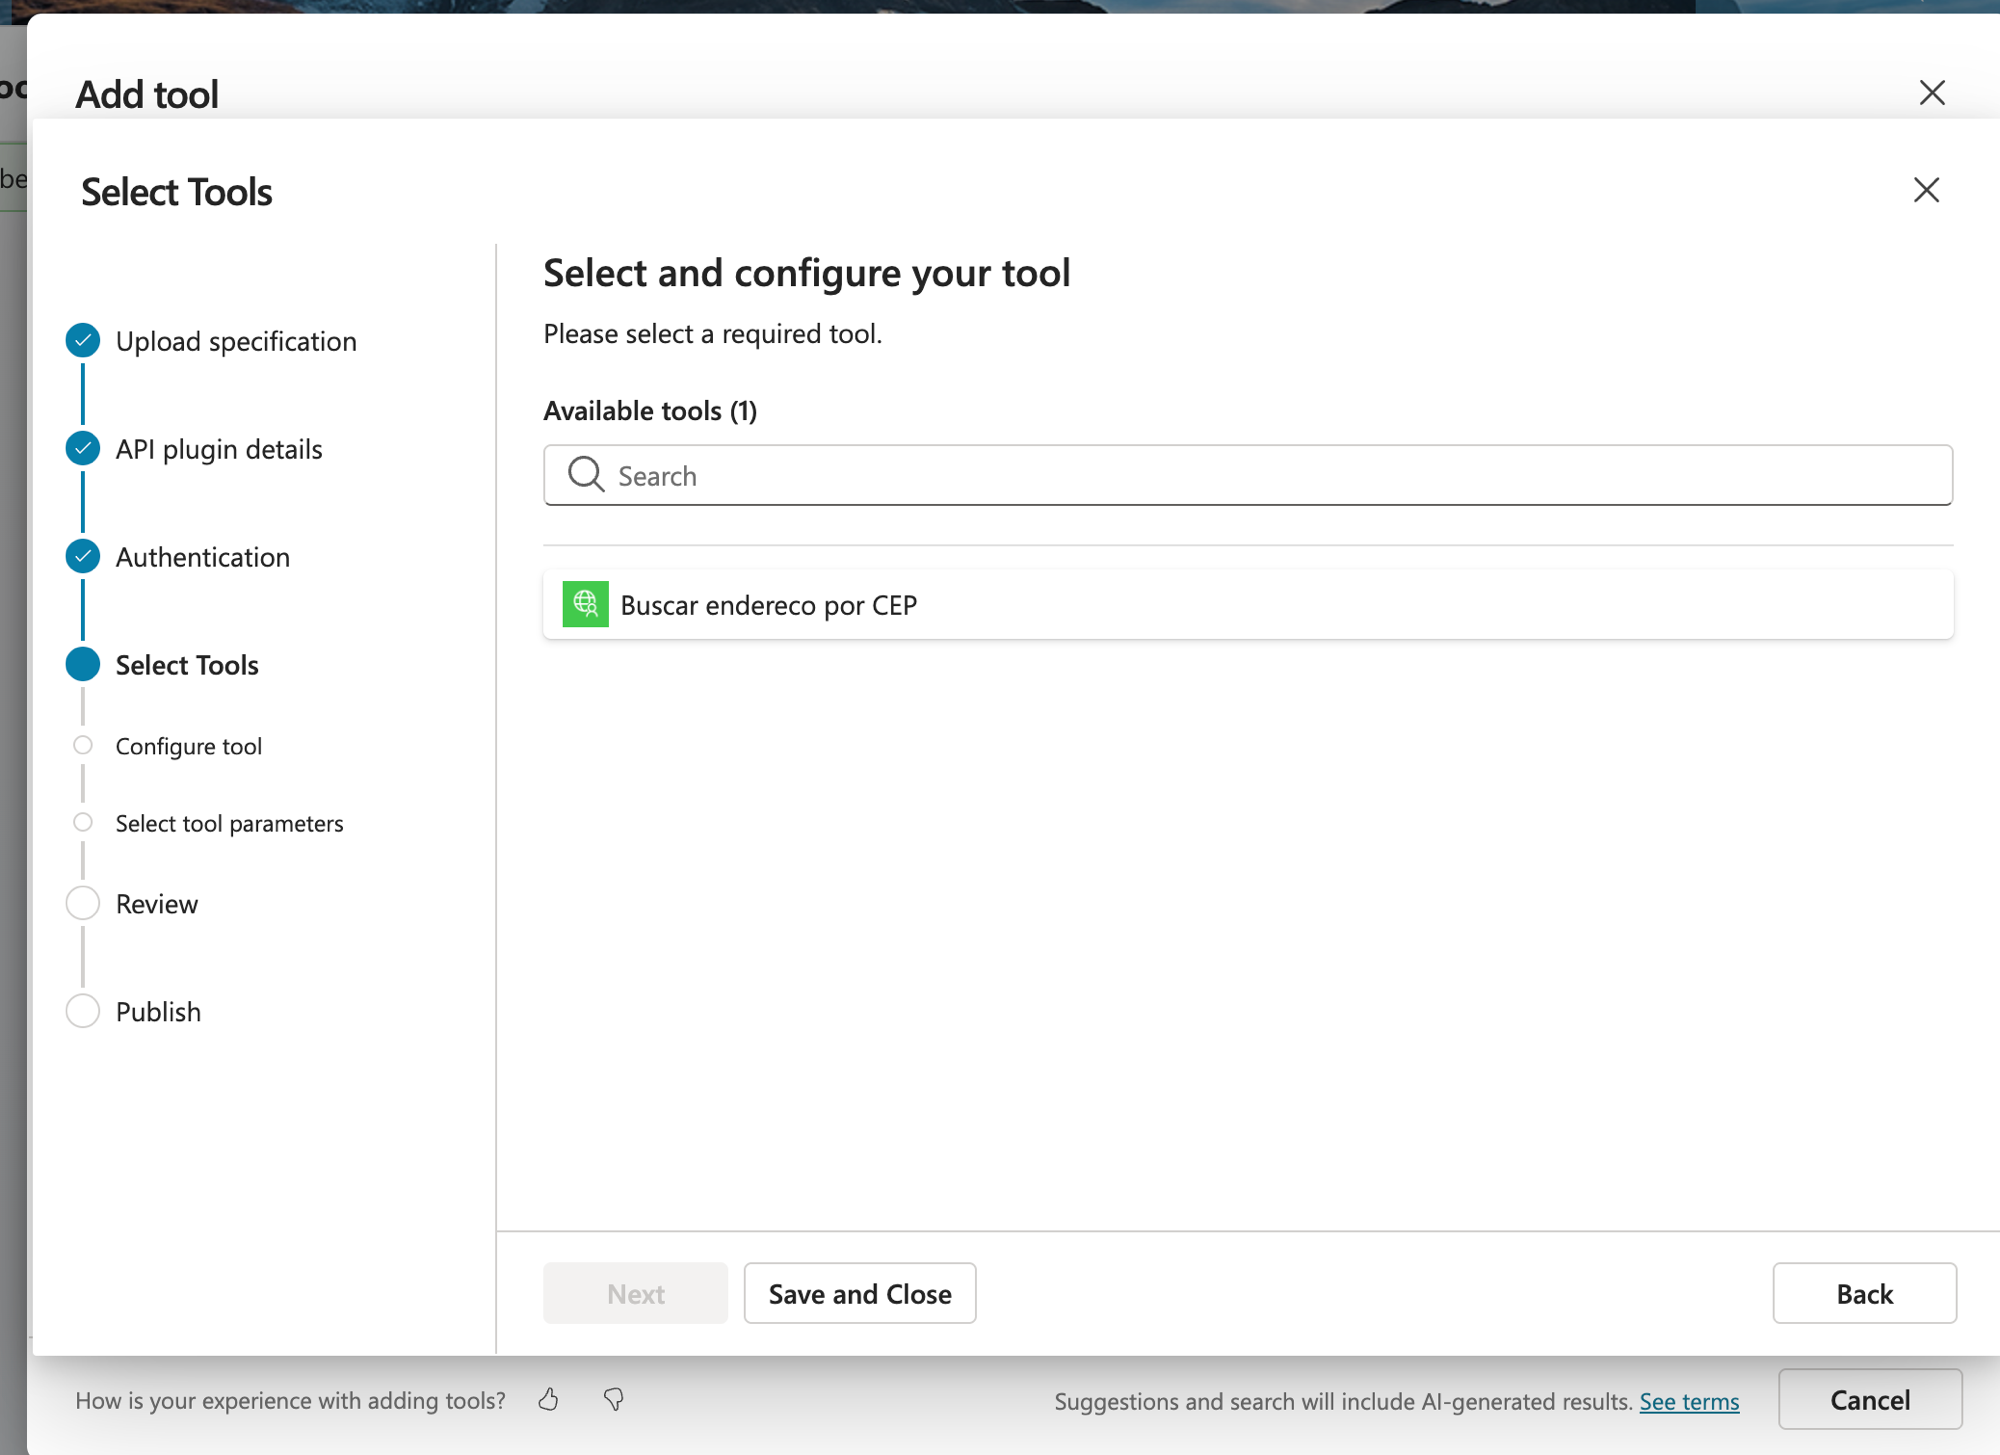
Select Tools: o Copilot leu meu OpenAPI e listou as operações que encontrou. Como meu arquivo tinha só uma, apareceu a "Buscar endereço por CEP". Marco ela.
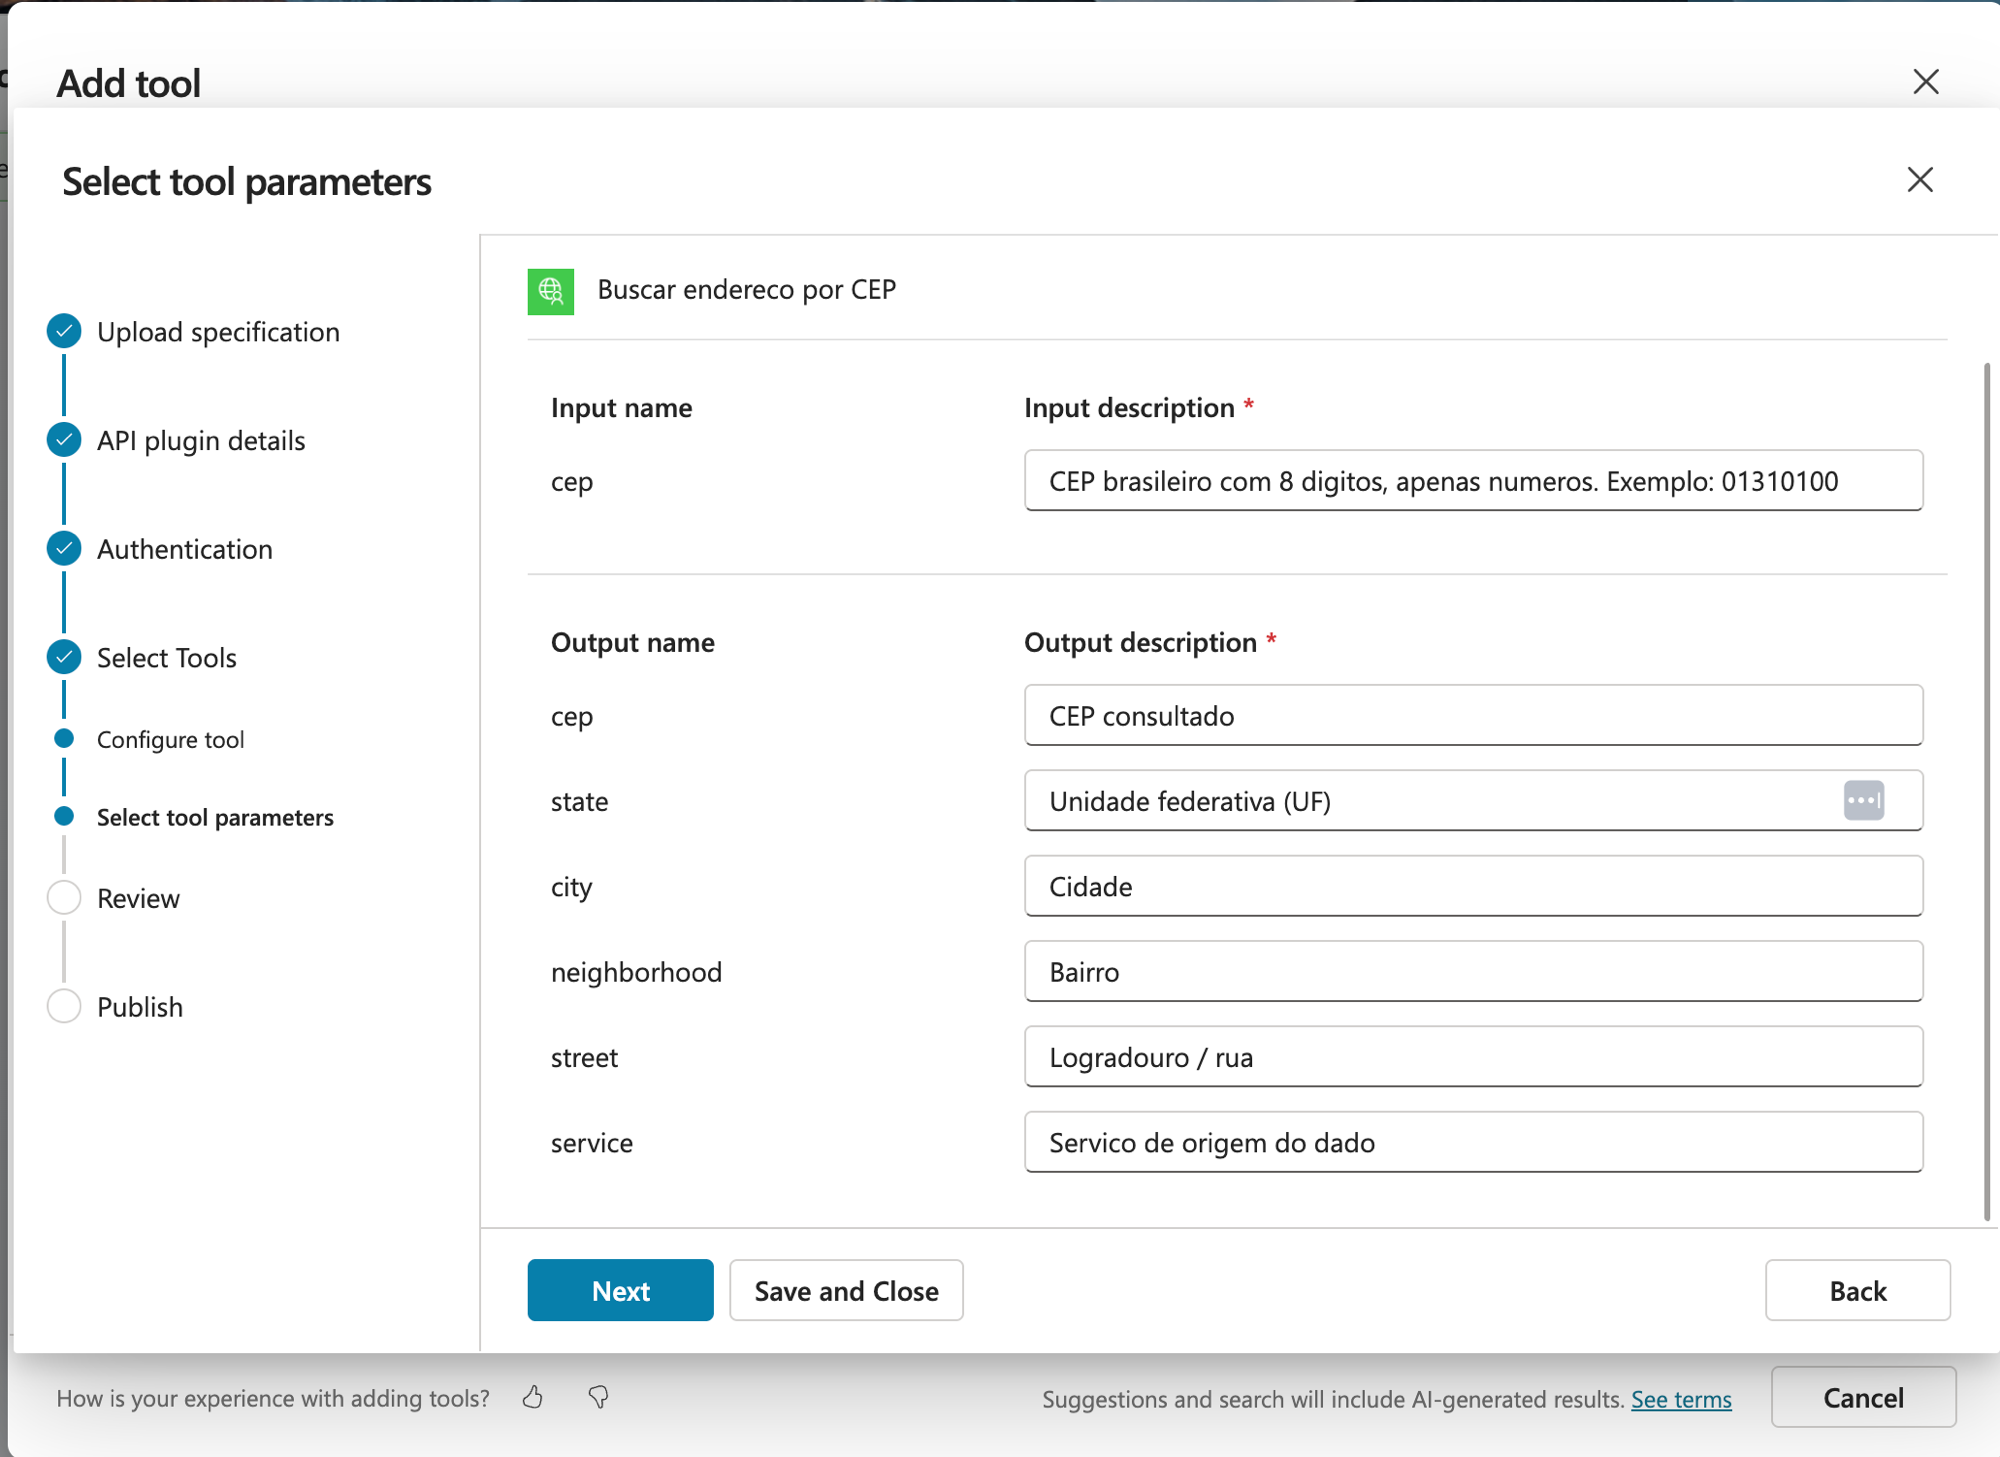
Select tool parameters: essa tela é importante. Ele mostra o input (o cep) e os outputs que a API devolve (cep, state, city, neighborhood, street, service), e pede uma descrição pra cada um. De novo, não pule isso: essas descrições ajudam o modelo a entender o que entra e o que sai. Preenchi cada campo com uma frase curta e direta.
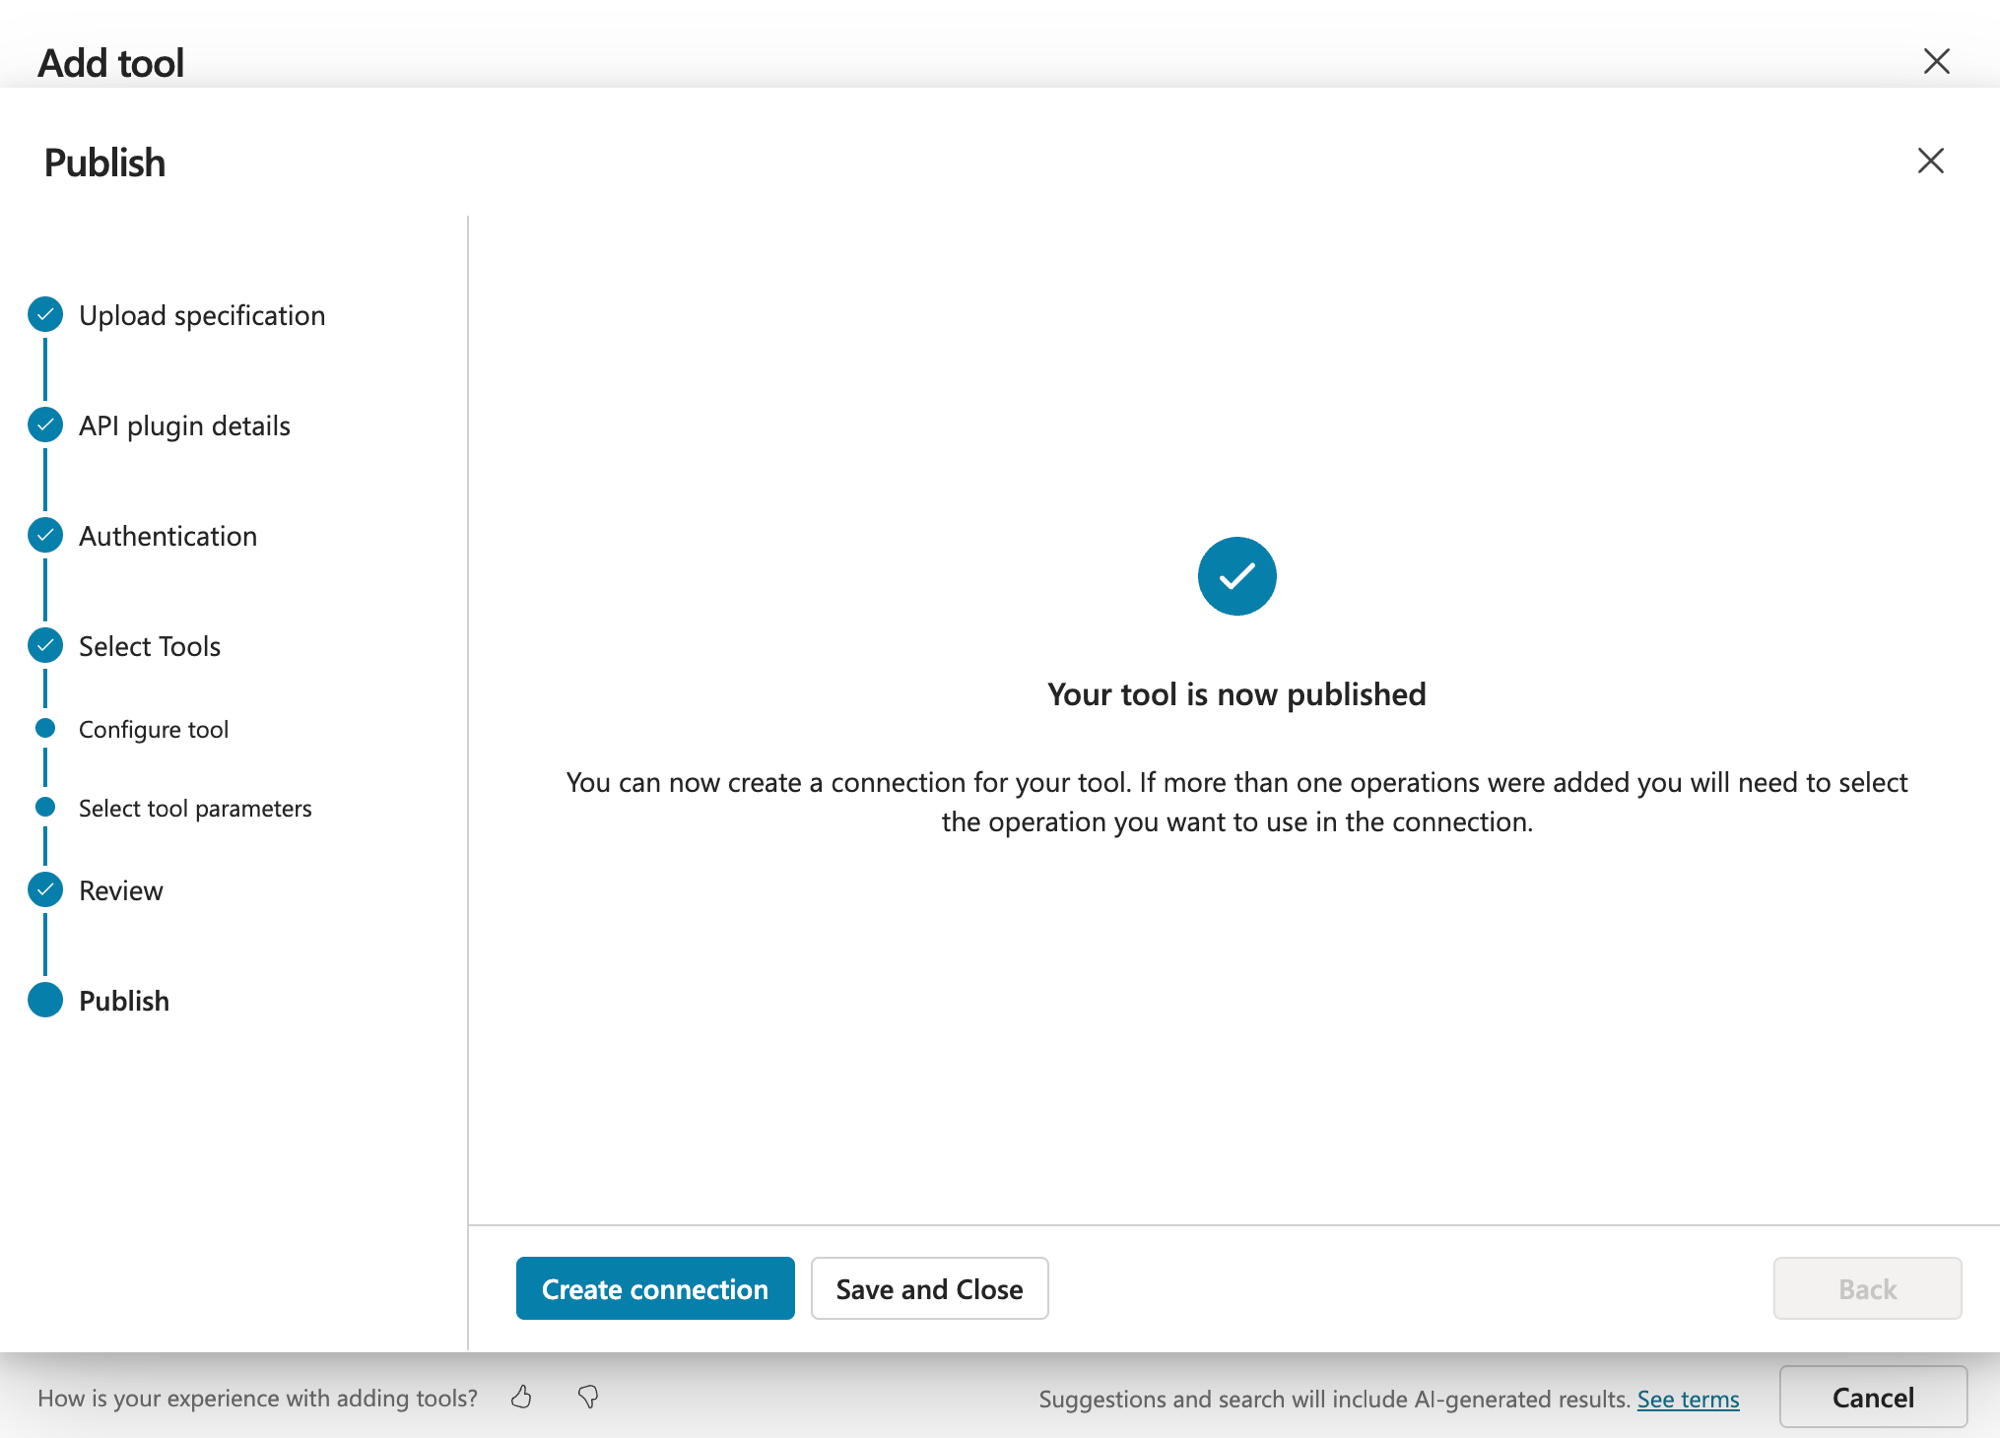
Depois do Review, veio a tela que a gente quer ver: Your tool is now published. Ele ainda oferece um "Create connection" ali, que é pra deixar a conexão pronta pro uso.
A tool no catálogo e o "Dynamically fill with AI"
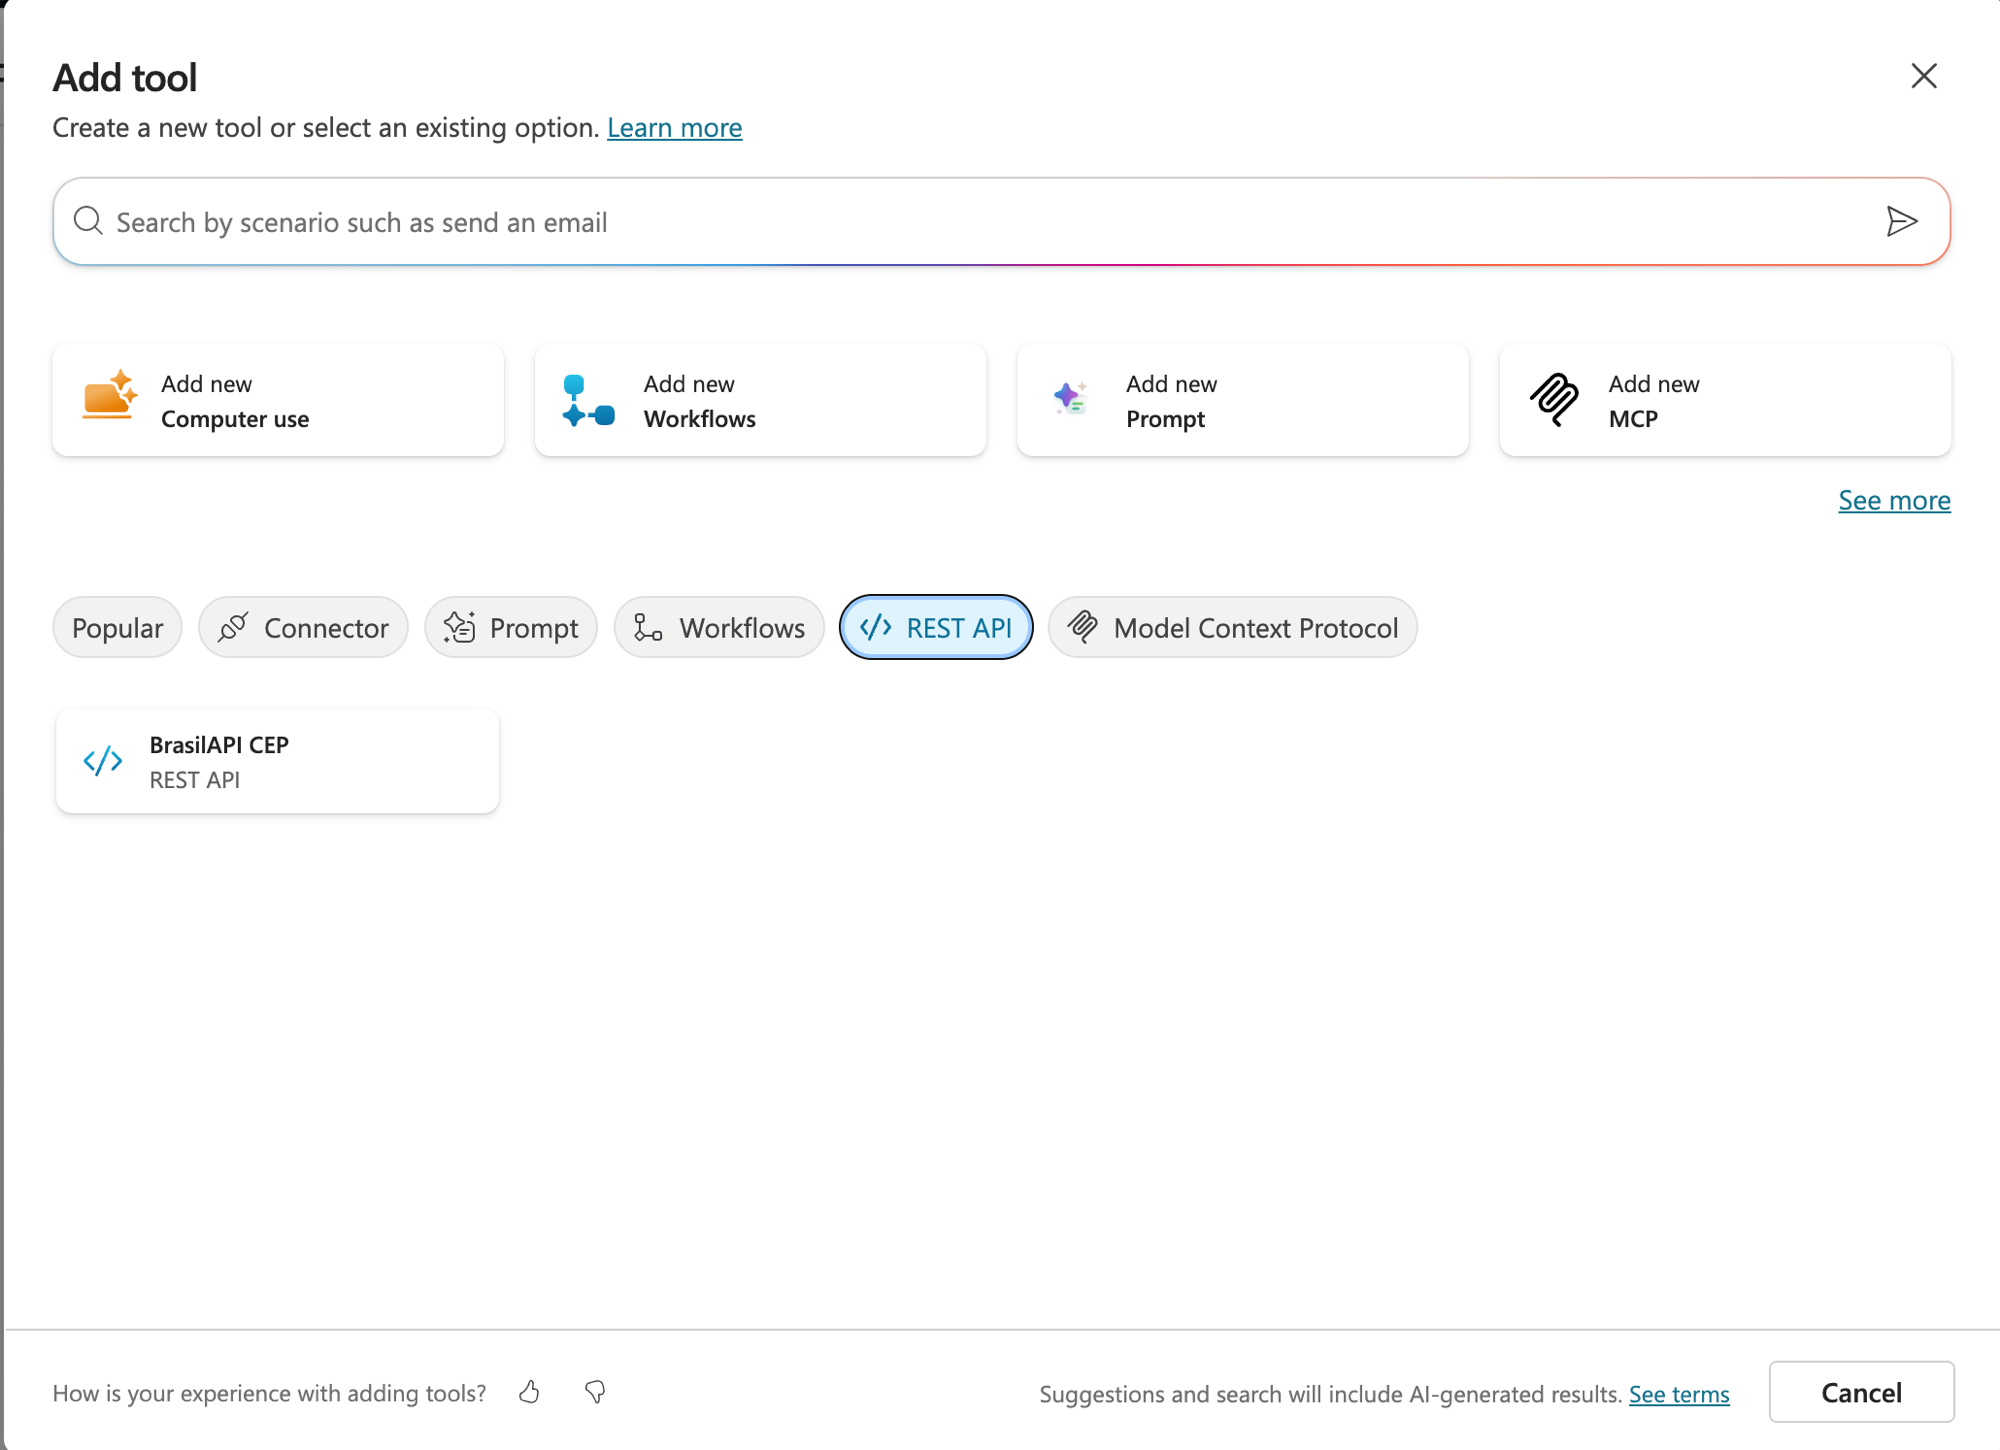
Feito isso, a minha API virou uma tool de verdade. Se eu voltar no catálogo e filtrar por REST API, lá está ela, a BrasilAPI CEP com o tipo REST API, do lado dos conectores prontos:
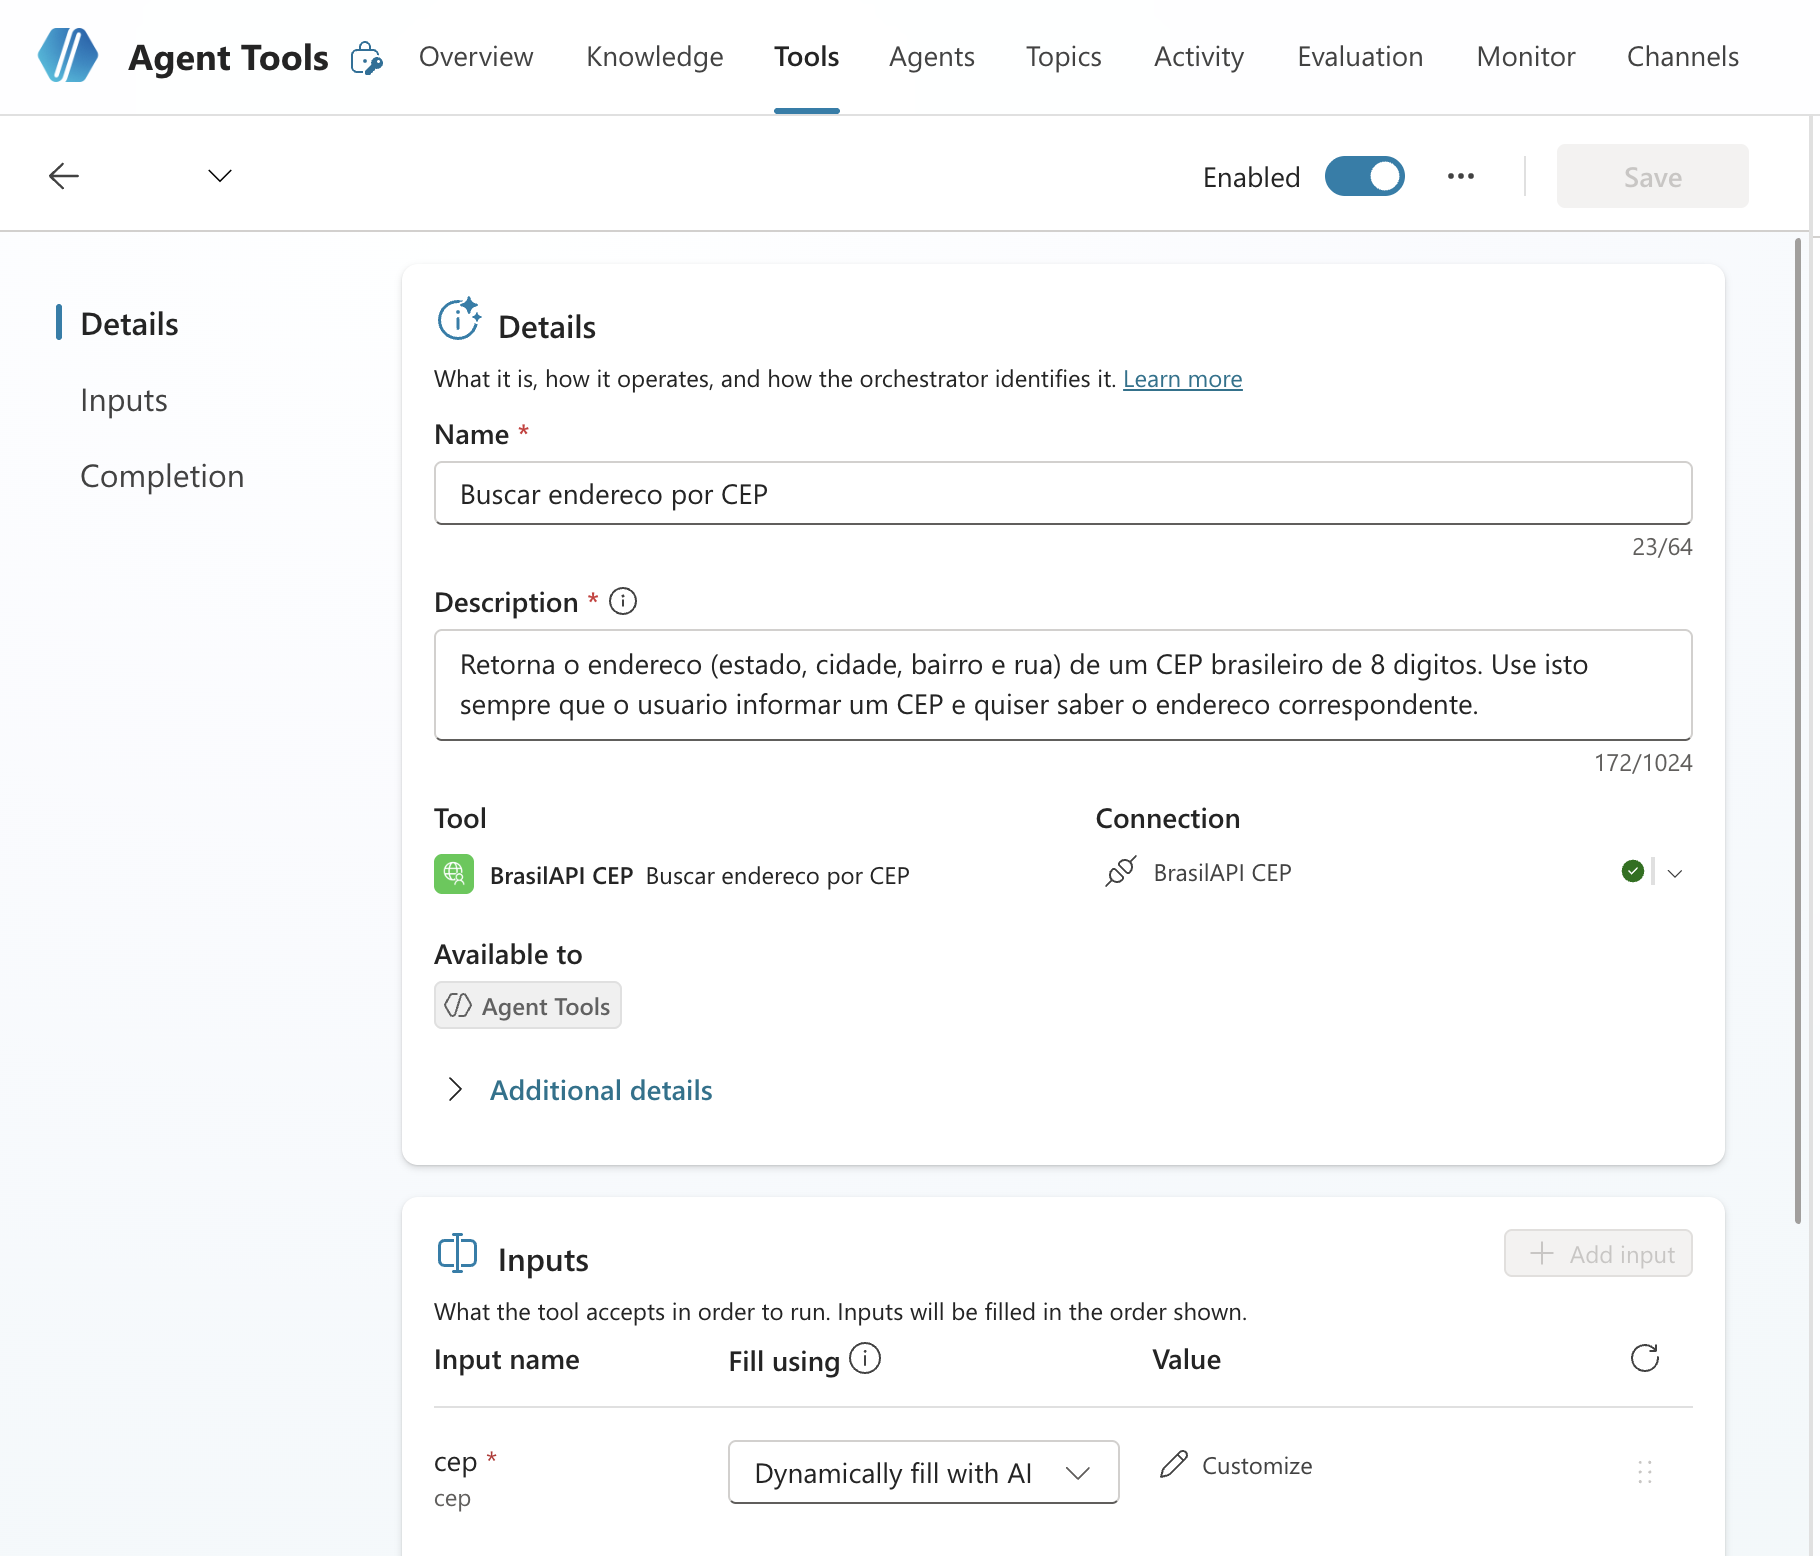
E abrindo os detalhes da tool tem um detalhe que eu curti muito. Olha o input cep: o "Fill using" está como Dynamically fill with AI. Isso quer dizer que eu não preciso pedir o CEP num campo separado, o próprio modelo extrai o CEP da frase do usuário e preenche o parâmetro sozinho. A conexão aparece com o certinho verde, tudo pronto.
Testando: o erro e o conserto
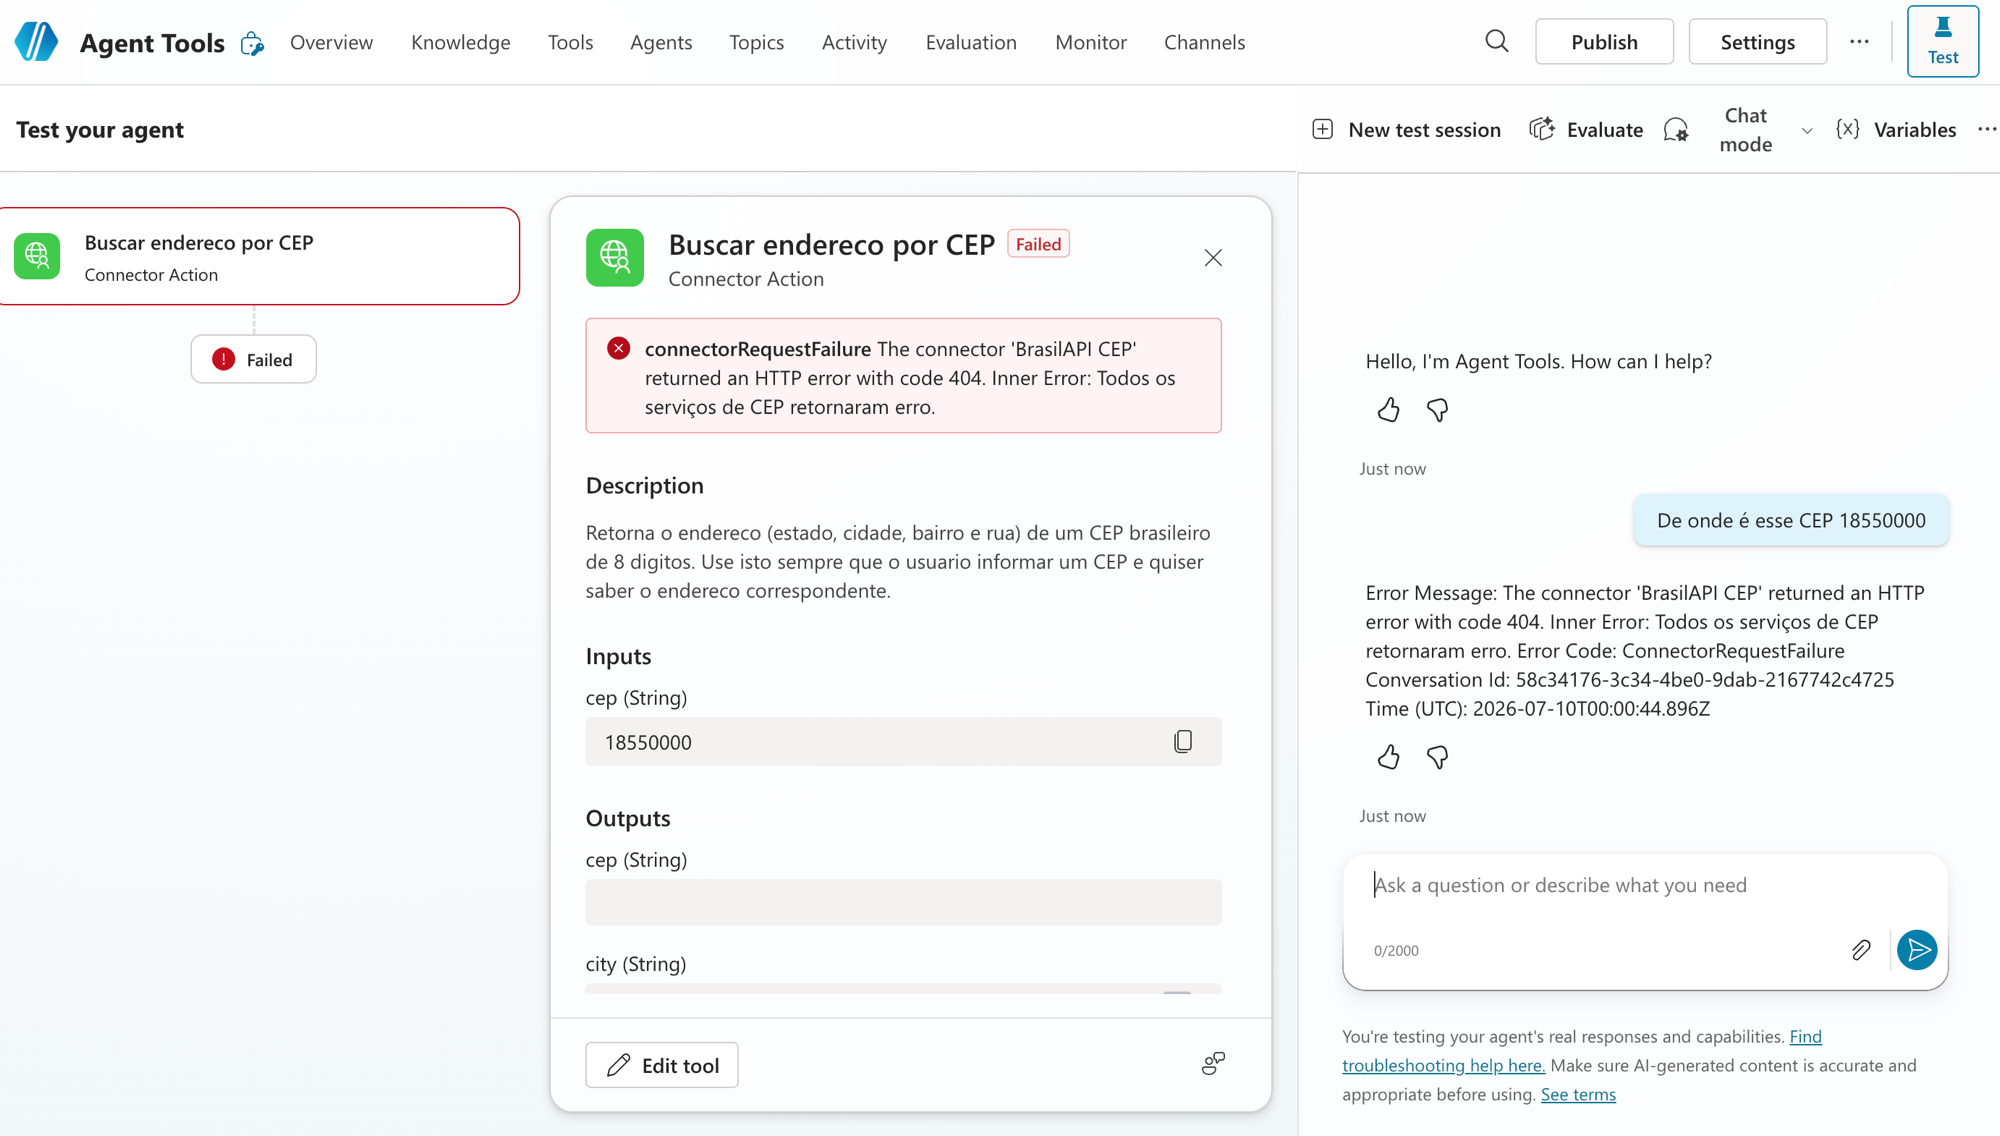
Bora ao teste, e aqui a coisa ficou real. Fui no Test your agent e perguntei "De onde é esse CEP 18550000?". O agente chamou a tool certinho, mas voltou Failed com um 404: "The connector 'BrasilAPI CEP' returned an HTTP error with code 404. Inner Error: Todos os serviços de CEP retornaram erro".
Reginaldo, quebrou já no primeiro teste?
Calma, esse erro é uma boa notícia disfarçada. Aquela mensagem "Todos os serviços de CEP retornaram erro" é a própria resposta da BrasilAPI, ou seja, minha tool chamou a API real, a API respondeu e o agente ainda mostrou o erro de forma limpa no chat. O problema era só o CEP: o 18550000 não é resolvido pelas bases que a BrasilAPI consulta. Testei na mão e confirmei, esse volta 404 e um CEP de rua conhecida volta 200.
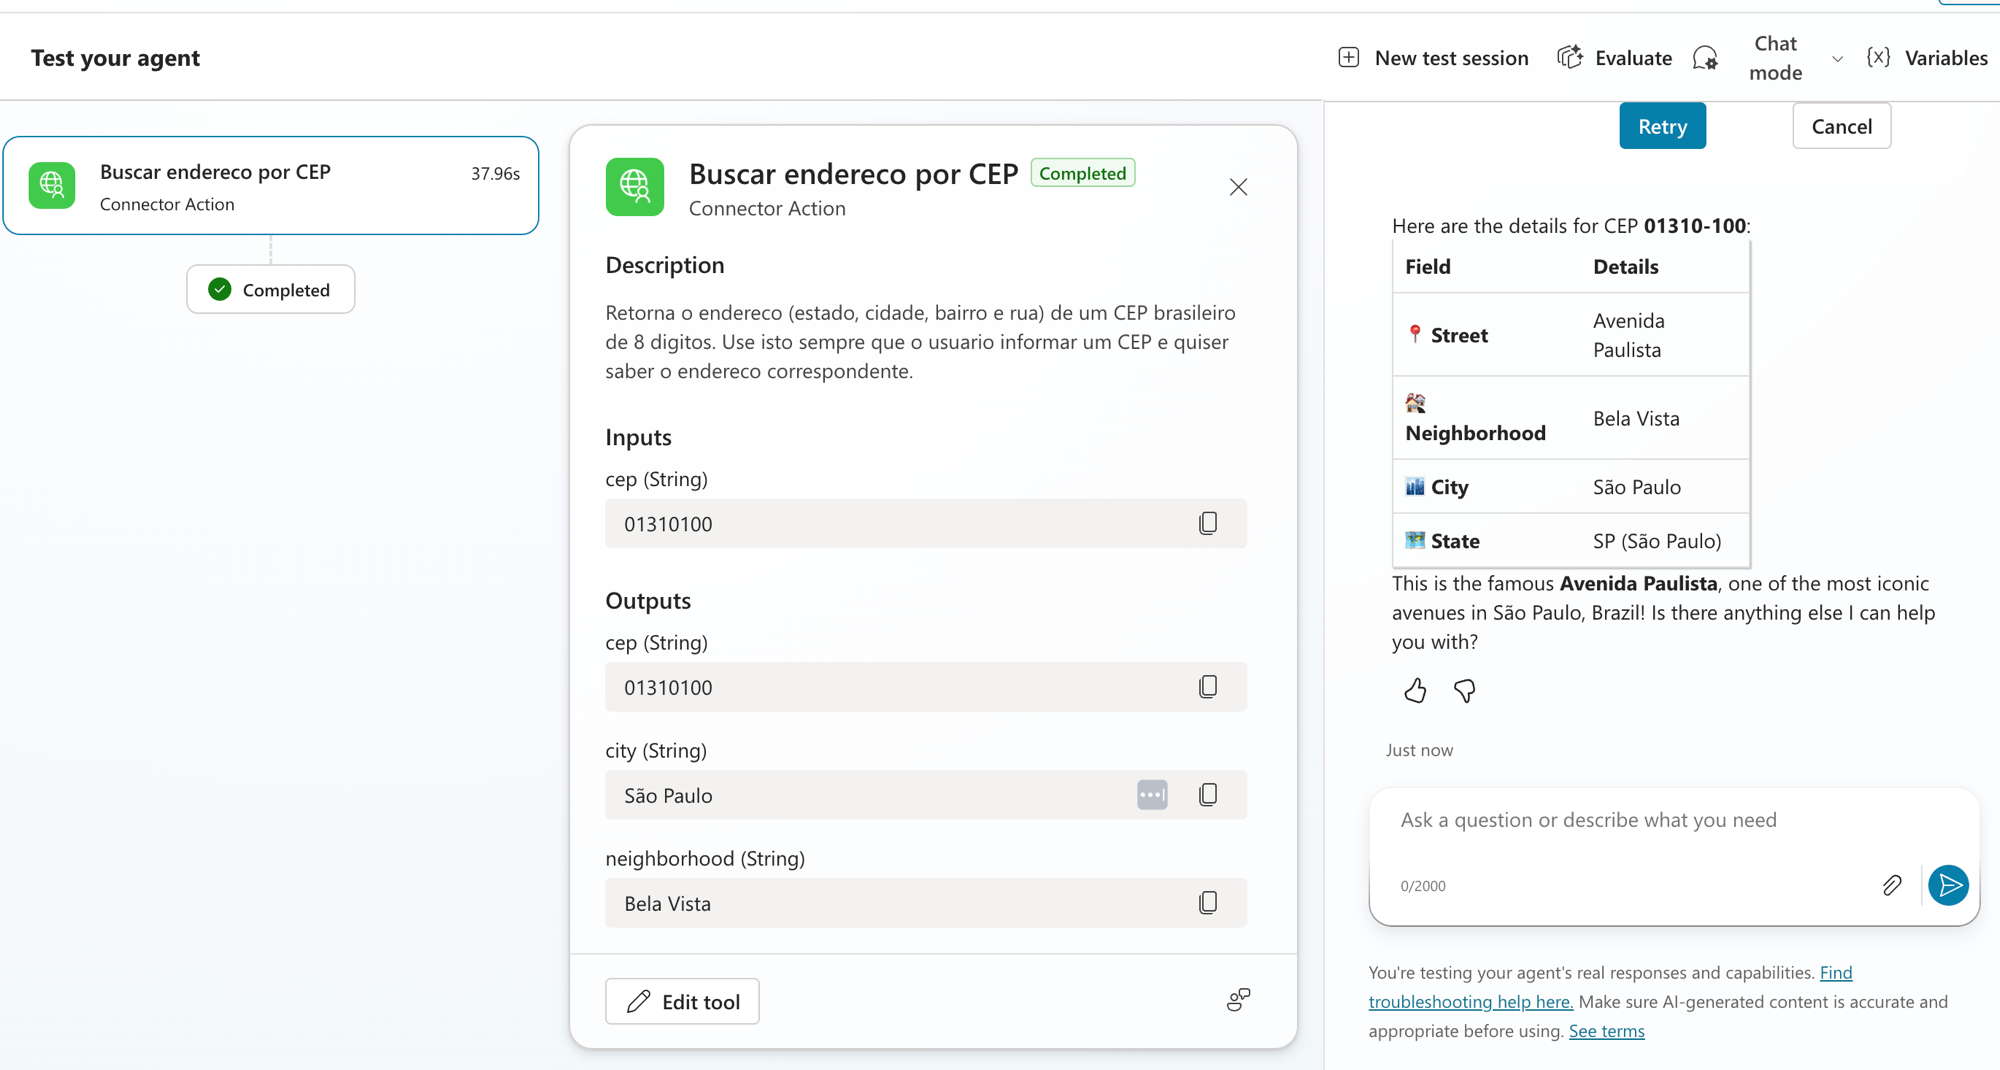
Troquei pro 01310100 (Avenida Paulista) e refiz a pergunta. Dessa vez veio Completed, e o agente montou uma tabela com Street, Neighborhood, City e State, ainda comentando que é a famosa Avenida Paulista:
Fica a dica: pra testar CEP na BrasilAPI, use um CEP de rua conhecida terminado em -000 (01310100, 20040002, 70150900). CEP genérico de cidade pequena às vezes não está nas bases e dá esse 404. E o mais importante do episódio: quando a tool falhar, o mapa de atividade e a mensagem de erro te dizem exatamente onde travou. Nesse caso, não era a minha configuração, era o dado.
RESUMO
Quando não existe conector pronto, use a aba REST API do catálogo e crie a tool a partir de um OpenAPI.
A tela de upload quer um arquivo OpenAPI 3.0 válido (drag and drop), não URL nem texto. Spec grande demais pode falhar na validação, um OpenAPI mínimo com só a operação que você quer resolve.
Por baixo a tool REST vira um API plugin, o mesmo formato do M365 Copilot.
No wizard: upload, plugin details, Authentication (No auth na BrasilAPI), Select Tools, parâmetros (capriche nas descrições de input e output), Review e Publish.
O input pode ficar como Dynamically fill with AI: o modelo extrai o valor da frase do usuário e preenche sozinho.
No teste, o 404 era a resposta real da API pra um CEP inexistente. Com um CEP válido (01310100) veio Completed e o endereço da Av. Paulista.
Com isso você já cria tool de conector pronto (post [1]) e de API própria via REST (esse aqui). No próximo post a gente sobe mais um degrau e conecta o agente a um servidor MCP, que é o padrão que está virando a cola universal entre agentes e ferramentas.
Referências:
https://learn.microsoft.com/en-us/microsoft-copilot-studio/add-tools-custom-agent
Fique bem e até a próxima.
#copilotstudio #restapi #openapi #ia #agentes #datainaction
Hey dataholics! Second post in the Tools series and, if in post [1] we grabbed a ready-made connector from the catalog, today it's the opposite scenario: what about when there's no connector for the API you need? Then you create your own, pointing at any REST API through OpenAPI. And I didn't come with theory only, I built a tool from scratch on top of BrasilAPI to look up an address by postal code (CEP), tested it live, hit an error along the way and fixed it. I'll take you through the whole flow with the real screenshots.
What we'll cover in this post:
When to create your own REST tool
The demo API: BrasilAPI (CEP), open and keyless
The OpenAPI file I uploaded
The wizard step by step: upload, plugin, auth, tools, parameters, publish
The tool in the catalog and "Dynamically fill with AI"
Testing: the 404 error and the fix
Summary
When to create your own REST tool
In the Copilot Studio catalog, besides the Connector filter, there's a REST API tab. It exists exactly for the case where none of the thousand ready-made connectors fits, like an internal API at your company or a public service that has no dedicated connector. Instead of waiting for someone to build the connector, you describe the API in an OpenAPI file (the old Swagger) and Copilot Studio builds the tool from it. It's zero code too, what you need is the API's contract.
One thing I noticed and it's worth noting: the wizard talks about an API plugin and the header still mentions "to use with Copilot for Microsoft 365". So under the hood your REST tool is published as an API plugin, the same format M365 Copilot uses. Good to know so the naming doesn't throw you off.
The demo API: BrasilAPI
For the demo I wanted a public API, no authentication, and something close to home. I picked BrasilAPI, which is open, asks for no key and has a published OpenAPI. I used the CEP (Brazilian postal code) endpoint:
GET https://brasilapi.com.br/api/cep/v2/{cep}It takes an 8-digit CEP and returns state, city, neighborhood and street in a clean JSON. A perfect scenario for an agent: the user sends a CEP and the agent answers with the address.
The OpenAPI file
Here's a heads-up that saved me time after struggling a bit: that upload screen doesn't accept pasting a URL or text, it wants a valid OpenAPI 3.0 file to drag and drop. BrasilAPI's full spec is large and modular, and it failed validation with an "Invalid OpenAPI specification". So I put together a minimal OpenAPI, with only the CEP operation, and uploaded that. It came out lean, like this:
{
  "openapi": "3.0.3",
  "info": { "title": "BrasilAPI CEP", "version": "1.0.0" },
  "servers": [ { "url": "https://brasilapi.com.br/api" } ],
  "paths": {
    "/cep/v2/{cep}": {
      "get": {
        "operationId": "getCep",
        "summary": "Buscar endereco por CEP",
        "description": "Retorna o endereco de um CEP brasileiro de 8 digitos.",
        "parameters": [
          { "name": "cep", "in": "path", "required": true,
            "schema": { "type": "string" } }
        ],
        "responses": { "200": { "description": "Endereco encontrado" } }
      }
    }
  }
}
Notice two fields that make a difference: the operationId (the operation's internal name) and the description, which as we saw in post [1] is what the model reads to decide when to call the tool. With the file ready, just drag it in:
The wizard step by step
After the upload, Copilot Studio takes you through an 8-step wizard (that trail on the left side). I'll go through the ones that matter.
API plugin details: I give the tool a name and description. I put "BrasilAPI CEP" and a description of what it does. The Solution field can be left blank and it creates an automatic solution for you.
The Authentication step was the easiest precisely because BrasilAPI is open: I chose No authentication and moved on. If it were an API with a key, this is where you'd configure the API Key or OAuth 2.0.
Select Tools: Copilot read my OpenAPI and listed the operations it found. Since my file had only one, "Buscar endereço por CEP" showed up. I select it.
Select tool parameters: this screen is important. It shows the input (the cep) and the outputs the API returns (cep, state, city, neighborhood, street, service), and asks for a description for each one. Again, don't skip this: these descriptions help the model understand what goes in and what comes out. I filled each field with a short, direct sentence.
After the Review, the screen we want to see showed up: Your tool is now published. It also offers a "Create connection" there, which is to get the connection ready for use.
The tool in the catalog and "Dynamically fill with AI"
Once that's done, my API became a real tool. If I go back to the catalog and filter by REST API, there it is, BrasilAPI CEP with the REST API type, right next to the ready-made connectors:
And opening the tool's details there's something I really liked. Look at the cep input: the "Fill using" is set to Dynamically fill with AI. That means I don't have to ask for the CEP in a separate field, the model itself pulls the CEP out of the user's sentence and fills the parameter on its own. The connection shows up with the green check, all set.
Testing: the error and the fix
Let's test it, and here things got real. I went to Test your agent and asked "Where is this CEP 18550000 from?". The agent called the tool just fine, but it came back Failed with a 404: "The connector 'BrasilAPI CEP' returned an HTTP error with code 404. Inner Error: Todos os serviços de CEP retornaram erro".
Reginaldo, it broke on the very first test?
Easy, this error is good news in disguise. That "Todos os serviços de CEP retornaram erro" message is BrasilAPI's own response, meaning my tool called the real API, the API answered and the agent even showed the error cleanly in the chat. The problem was just the CEP: 18550000 isn't resolved by the bases BrasilAPI queries. I tested it by hand and confirmed, that one returns 404 and a well-known street CEP returns 200.
I switched to 01310100 (Avenida Paulista) and asked again. This time it came back Completed, and the agent built a table with Street, Neighborhood, City and State, even mentioning it's the famous Avenida Paulista:
Here's the tip: to test a CEP on BrasilAPI, use a well-known street CEP ending in -000 (01310100, 20040002, 70150900). A generic small-town CEP sometimes isn't in the bases and gives that 404. And the most important part of the episode: when the tool fails, the activity map and the error message tell you exactly where it broke. In this case, it wasn't my configuration, it was the data.
RECAP
When there's no ready-made connector, use the catalog's REST API tab and build the tool from an OpenAPI.
The upload screen wants a valid OpenAPI 3.0 file (drag and drop), not a URL or text. A spec that's too big can fail validation, a minimal OpenAPI with just the operation you want solves it.
Under the hood the REST tool becomes an API plugin, the same format as M365 Copilot.
In the wizard: upload, plugin details, Authentication (No auth on BrasilAPI), Select Tools, parameters (take care with the input and output descriptions), Review and Publish.
The input can be set to Dynamically fill with AI: the model pulls the value out of the user's sentence and fills it on its own.
In the test, the 404 was the API's real response to a non-existent CEP. With a valid CEP (01310100) it came back Completed with the Avenida Paulista address.
With that you can already build a tool from a ready-made connector (post [1]) and from your own API through REST (this one). In the next post we go one step further and connect the agent to an MCP server, the standard that's becoming the universal glue between agents and tools.
References:
https://learn.microsoft.com/en-us/microsoft-copilot-studio/add-tools-custom-agent
Stay well and see you next time.
#copilotstudio #restapi #openapi #ai #agents #datainaction
Gostou? Tem mais no YouTube e no LinkedIn.
Enjoyed it? There's more on YouTube and LinkedIn.
Continue lendo Keep reading
![GitHub Copilot a fundo [5] - AI Credits: o Copilot virou usage-based](/images/ghcopilot-aicredits-capa.png)
GitHub Copilot a fundo [5] - AI Credits: o Copilot virou usage-based
Ler → Read →![GitHub Copilot a fundo [4] - Copilot CLI: o agente que mora no seu terminal](/images/ghcopilot-cli-capa.png)
GitHub Copilot a fundo [4] - Copilot CLI: o agente que mora no seu terminal
Ler → Read →![GitHub Copilot a fundo [3] - MCP: ferramentas para o agente sem perder a governança](/images/ghcopilot-mcp-capa.png)